All about NSX-T

I got very very awesome way to learn NSX-T so I just wanted to share with you guys.

I erased all the content of my previous postbecause duplicating the text is not smart way and specially if it is already written in better way and by VMware.

Just browse below link, login with your VMware account credentials (if you have already sign-up otherwise you need to sign-up first) and start exploring NSX-T because future is T.

https://labs.hol.vmware.com/HOL/catalogs/enrollments/lab/NEE-049991_40988847_

Keep up the pace guys..


Thank you,
Team vCloudNotes

NSX | Deny vs Reject

In NSX, while configuring firewall rules in Edge or in DFW, you might have noticed that there are three option while choosing any action for any incoming or outgoing packet.

In DFW - it is Allow, Block and Reject
In ESG - it is Accept, Deny and Reject

Reject action sends following responses-

  • RST packet for TCP Connection
  • ICMP unreachable with network administratively prohibited code

Deny action silently drops packet from or to the specified source and destination. For example, RTO.

Feel free to ask any question folks.


Thank you,
Team vCloudNotes

NSX | What happens when.....

Since last few days, I was getting lots of questions like what happens when host down, control VM down or a controller down etc.

Then I thought to list down all the cases but fortunately I found below VMware article which explain well about it.

I hope you too will like it.


Thank you,
Team vCloudNotes

vROPS | How to get list of VMs with connected ISO files

Below vROPS view will help you to get a report having name of all those VMs which have connected CD-ROM and .iso file attached.

This solution was given to one of the team who was struggling to find some way to have this kind of report. 

Step 0: Login vROPS
Step 1: Browse vROPS to create a view
Step 2: Give it Name --> Presentation as "List" --> Subject as "Virtual machine" --> You can select Data as "Parent vCenter, Name and vcenter etc."
Step 3: Now go to Filter button as shown in below image and configure as shown


Now simply save the View and use it as you want.

False: Means this view will show all VM which has connected CD-ROM drive
True: Means VM where CD-ROM drive is disconnected

One issue can be there that you might not see snipped option\metric for "Configuration|Security|Disconnected CD-ROM" because in some cases, it is not default activated and need to enable manually from vROPS policy.

That's the topic for another post "How to enable any metric in vROPS".

Let me know if you need any clarification\further suggestion or if you face any issue during the view creation. I will surly help you out.


Thank you,
Team vCloudNotes

vCenter | Change Power Management Policy on all ESXi hosts

Hi Guys,

To know in detail about Host Power Management Policy, click here. In short, in production environment, it should be "High Performance" otherwise many issue may arise like latency while backing up a VM or VM was not responding between interval of time etc. So, if it is "Balanced" then it could be one of the reason. Right now, login your vCenter and check the power management policy and change it if it is not the appropriate one.

Now, if you are changing this policy on hundreds of host then doing it manually can be a headache. Let use Powershell to get it done in a minute.

#Start here

Connect-VIServer vc1.mylab.net #of course to connect VC
$view = (Get-VMHost | Get-View)
(Get-View $view.ConfigManager.PowerSystem).ConfigurePowerPolicy(x)

#End here

in above commad ".ConfigurePowerPolicy(x)" is as below

x= 1 ; for High Performance
x=2  ; for Balance

x=3  ; for Low Power

x=4  ; Custom 

Please note : 

1. There is no downtime for this change
2. Above command will change the current policy for all esxi host. In case, you need to change the power policy for single host then follow below command 

#Start here

$view = (Get-VMHost -Name esxi01.mylab.net | Get-View)
(Get-View $view.ConfigManager.PowerSystem).ConfigurePowerPolicy(x) 

#End here

We just mentioned the host name in above command. You can use below command to cross check the current setting in all esxi hosts.

#Start here

Get-VMHost | Select Name, @{N='Current Policy';E={$_.ExtensionData.Hardware.CpuPowerManagementInfo.CurrentPolicy}} 

#End here


Thank you,

vCloudNotes


ESXi | Error while backing up Configuration of ESXi host

This time I got a problem with ESXi host where team was getting and "Internal Server Error" while taking the backup of configuration of ESXi host.

I checked and found that on that host folder "Downloads" was not there in Scratch partition. I simply SSH the host and created the folder with command "mkdir downloads" in scratch partition and taken the backup with below Powershell command successfully.

#Start here
Connect-VIServer vC1.mylab.net

$folder = New-Item -ItemType Directory -Path "D:\Host configuration\$((Get-Date).ToString('yyyy-MM-dd'))" -Force

Get-VMHost | Get-VMHostFirmware -BackupConfiguration -DestinationPath $folder

#End here


Thank you,
Team vCloudNotes

NSX | All about control plane

When I was learning about NSX Control plane, I couldn't find all information in a single pane or page. Information was there but scattered. I thought to gather all the info and put it in below way. I found it better to learn in future. Please don't shy to leave your feedback if you find it useful too.

Below are the components of NSX control plan
  • NSX Controller Cluster
  • Control Plane Agent (netcpa)
  • NSX Logical Router ControlVM


Now Let's explore each of above in detail. 

NSX Controller Cluster
  • NSX controllers provide control plane functionality.
  • Controllers distribute logical routing network information to ESXi hosts.
  • It is responsible for updating ESXi host on the state of the logical network components.
  • NSX cluster uses "Sharding" process to distribute workload across NSX controller cluster nodes. Sharding is the action of dividing the NSX controller workload into different shards so that each NSX controller instance has an equal portion of work
  • Supported and recommended number of controllers are at least 1 for dev and 3 for production
  • A distinct controller node acts as a Master node for given entities such as logical switching, routing and other services.
  • When one controller fails, master nodes redistribute the shards to the remaining available clusters.
  • The election of the master for each role requires a majority vote of all active and inactive nodes in the cluster. This is the primary reason why a controller cluster must always be deployed with an odd number of nodes.
  • It communicate with Control Plane Agent (Netcpa)
  • It reduce ARP flooding through ARP suppression.
  • NSX controllers creates and save ARP, MAC, VTEP and dynamic route distribution tables.
  • NSX controllers are required to implement vxlan networking.
  • It is required if you are deploying distributed routers or VXLAN in unicast or hybrid mode.
  • If one controller is down, there will be no impact on NSX control plane as other two will service in the NSX cluster.
  • If two controllers are down, there will be no impact on running routing configuration but third controller will be read-only and will not support any configuration changes.
  • NSX controllers work with CDO (Controller Disconnected Operation) mode, in case all the three controllers are down or any host lost its connectivity with control plan
  • NSX Controller communication channel
    • Management plane communicates with controller clusters over TCP 443 port number
    • The management plane directly communicates with vsfwd in esxi host over TCP 5671 by using RabbitMQ to push down firewall configuration changes
    • Control plane talk to the netcpa agent over TCP 1234 to propagate L2\L3 changes
    • netcpa propagete these changes to respective routing and VXLAN kernel modules in the ESXi host.


Control Plane User World Agent

  • Control plane agent (netcpa) is a TCP client that communicates with the controller using control plane protocol
  • It uses SSL to secure the communication with NSX controller instances
  • it mediates between controller instance and hypervisor kernel module
  • It sends information about network connectivity, IP and MAC address to NSX controllers
  • It retrieve configuration information from nsx manager through vsfwd
  • Beginning with version 6.3, an auto recovery mechanism has been added to user world agents (netcpa and vsfwd)
    • The automatic user world agent monitoring process detect the user world agent in wrong state and try to recover it automatically
    • If the user world agent reports a temporary failure due to delayed response to health check then, a warning message is reported in the VMkernel logs
  • User world agents are deployed by NSX manager on ESXi hosts through EAM during host preparations.
  • Each ESXi hosts in NSX cluster run two user world agents (UWA) that are netcpa and vsfwd.
  • Below is the classic screenshot to explain it. Taken from VMware e-book
 
  • netcpa auto restart operations:
  1. netcpa update the global lock periodically
  2. An external script checks the heartbeat counter to see whether netcpa failed
  3. If netcpa failed, the script restart the daemon and generate the core dump and alerts. Watchdog events are recorded in /var/log/syslog.log
  • Verify netcpa agent service in esxi host
Login ESXi host and run the command
 
# /etc/init.d/netcpad status 


Control VM
  • It is a component of control plane and not a data path. Mind it:)
  • It establish OSPF\BGP neighbour peering.
  • It pushes the routing updates to controller cluster
  • Control VM is must have component for High availability configuration and with dynamic routing configuration
  • NSX CVM communicates with NSX manager and controller cluster
  • It sends the routing information to controller clusters
  • NSX manager sends LIF information to controller cluster and control VM
  • In case, you have static routing then no edge\DLR in HA then you don't need it 
  • The DLR control VM can be configured to redistribute IP prefixes for all the connected logical networks into OSPF
  • NSX edge pushes the prefixes to reach IP networks in the external networks to the control VM

That's all folks for now but I will keep on adding in the list.

Feel free to ask to cover any specific topic on this.


Thank you,
Team vCloudNotes

NSX | IP Discovery

Of course, NSX need to know the IP address of any VM and to find the IP address of any VM it uses below methods

- VMware Tool installed on every VM
- DHCP Snooping (Enabled on host cluster)
- ARP Snooping (Enabled on host cluster)

Multiple methods can be used to discover the IP and can be used in below operations\task by NSX Manger

- Firewall Rules
- Spoofguard


IP Discovery with VMware Tools-

VMware tools use thin agent that must be installed on each and every VMs which needs to be protected.
Virtual Machine with installed VMware tool is automatically secured whenever they are started up on any ESXi host having NSX VIB installed.
Protected virtual machines retains the security protection through shutdown and restart and even afrter vMotion move to another host with installed NSX VIBs.
If Vmware tool is not installed then other methods can be used like DHCP and ARP snoopiong.

IP Discovery with DHCP Snooping-

As you already know that DHCP snooping can discover IP without Vmware Tools installed. The four broadcast (DORA) frames that DHCP uses to provide IP address is visible to logical switch or distributed port group as these frames are processed. The assigned IP address then mapped to vNIC. This mapping can be used by NSX Manager to assign firewall rules for this object.

The option to enable and disable the dhcp snooping is available on each cluster.

IP Discovery with ARP Snooping-

It can also be used when there is no VMtools installed in the GuestOS. The ARP request and ARP reply passes throught the logical switch are read and IP addresses associated with vNIC. This association can be used by NSX Manager to apply firewall rules for this object.

Please note that SppofGuard is a feature that in some cases, can prevent ARP snooping in virtual environment.


Happy Learning Friends!


Thank you,
Team vCloudNotes

,

PS | Automation can be dangerous!

Hi Folks,

Everyone loves automation. It is very exciting to see that operations is happening automatically. But it will not take much to convert from excitement to graveyard regret if not executed in correctly or in a perfect manner.

I would like to share one example where we were in process of upgrading all NSX edges. As per plan, we selected around 100 edges to upgrade first and then we had to wait for further approval and all.

So we picked the powershell command and executed for those 100 edges. Command is very simple and one liner command. Nothing complex in that but.....

A blank enter key created mess. Let's see how!

Check the command first

In that command, there is source file which is saved with .txt extension. In that file, edge ids needs to be mentioned. isn't it? Then execute the script.

Very simple :)

but what ruin the task is, in that .txt file, edge were mentioned like

edge1
edge2
edge3
.
.
.
and so on and nothing wrong.
But in last row, there was a blank enter after last edge ID.

Script was taking this as an object "ALL" and executed the upgrade action on all other edges as well which were not in that .txt file.LOL!

What a mistake and what a mess!!

Solution is either don't give a blank enter or use .csv file rather than .txt file whenever giving source to an PS script.

Be careful guys. It is operations....LOL.


Thank you,
Team vCloudNotes
,

NSX | Plan upgrade with care

Good Morning Folks,

Purpose of this post is to make all of you aware about one of the supported feature of NSX which is no more supported started from version 6.4.4.

Why specifically I am sharing it because it can be a good example on "How you should plan the upgrade".

Feature is "Starting from 6.4.4, 3DES as an encryption algorithm in NSX Edge IPsec VPN service is no longer supported."

Now question is what does it mean and how it will impact production.

What does it mean?
Hope you know that in IPSec VPN tunnel there are two endpoints, one is local and other is remote. 3DES is encryption algorithm which we use to secure the connection between these two endpoints. In place of 3DES, we have AES, AES256 and AES-GCM. We have to select anyone of above because 3DES is no more supported or listed in nsx edge version 6.4.4.

Why it is depreciated?

Because it is not that strong. To elaborate, 3DES designed to auto-negotiate the encryption value to establish the connection, which is not a secure way to make a connection with remote site. Whereas other cipher must be common on both end to establish the connection.

How it will impact the production?

Let's say you have 3DES configured on remote end in phase2 configuration and your local end is configured with AES256. With prior version 6.4.4, IPSec VPN tunnel will continue to work but as you will upgrade NSX edge to 6.4.4, your tunnel will down because both values are not matching any more. You must change the value at remote end to match the value at local site(end).

So please be aware and always check the Documentation of every new version of all products before upgrade.


Feel free to share any thought\doubt\feedback.


Thank you,
Team vCloudNotes


NSX | What is 3 and 5 tuple value?


This question was asked in one of my interview and I was not that knowledgeable to answer it at that time. I don't want anyone else (who learn NSX and my blog. I have no way to share it with all the world:)) to be unanswered on this question. With this thought, I am writing the answer below. 

It is very small thing but matter a lot while asked in an interview.
 
It refers to a set of three and five different values that comprise a TCP\IP connection. It include as shown below.

 
3-Tuple:  The tuple (source IP address, destination IP address, ICMP
      Identifier).  A 3-tuple uniquely identifies an ICMP Query session.
      When an ICMP Query session flows through a NAT64, each session has
      two different 3-tuples: one with IPv4 addresses and one with IPv6
      addresses.

5-Tuple:  The tuple (source IP address, source port, destination IP
      address, destination port, transport protocol).  A 5-tuple
      uniquely identifies a UDP/TCP session.  When a UDP/TCP session
      flows through a NAT64, each session has two different 5-tuples:
      one with IPv4 addresses and one with IPv6 addresses.
 
I hope who didn't know about this, it will add value in them. 
 
Be Interview ready and Always! You never know when you will get golden opportunity and that call,you were waiting for since long.


Thank you,
Team vCloudNotes 
, ,

PS | How to read content of any file inside GuestOS without logging in?

I am doing lot around powershell these day. Let's see one more Challenge given and provided solution.

Basically, this challenge belongs to my last blog. Here I was asked to read the content of a file in a VM without accessing RDP. Sound interesting? isn't it?

#Start here
Connect-VIServer vCenter1
$VM = read-host "Enter VM Name " #here is the target vm name

$Chpass = @"
#below command will read and give output for entire file
(Get-Content -Path C:\DRTask\vm-startup-regIpDns_v9.ps1
#below command will read line number 8 and will give you output
    (Get-Content -Path C:\DRTask\vm-startup-regIpDns_v9.ps1 -TotalCount 8)[-1]

"@

Invoke-VMScript -VM $VM -ScriptText $Chpass #-GuestUser "$user" -GuestPassword "$pass"  -ScriptType Powershell

#Start here

Below is output- I got the text in line number8 that that has the IP address in file inside the guest OS.


Basically it read the file with the help of VMware tools in vcenter server.

Cheers! let me know if it worked for you as well. In case of any error please don't shy to put a comment or mail me.


Thank you,
Team vCloudNotes


,

Powershell | Transfer file into VM

Hi Guys,

I hope that this post will help many because everyone once in their career might encounter this issue.

The issue is, "RDP for this VM is not working\allowed, how can I transfer this file into this VM". I have seen many guys facing this issue, So, below is the solution

#start here
clear
$VC = Read-Host "Enter the IP address\fqdn of vCenter server"
Connect-VIServer $VC

Write-Host "Enter the requested info please" -ForegroundColor Cyan
Function Collectdata{
Write-Host "Enter the path of source file. For example, C:\temp\transferfile.txt"
$source = Read-Host "Enter the path here"
Write-Host "Enter the destination folder in VM where you want to copy above file. For example, C:\temp"
$dest = Read-host "enter the destination folder path here"
$VM = Read-Host "Enter the VM Name"
$user = Read-Host "Enter the username"
$pass = Read-Host "enter password" -AsSecureString
Write-Host "Thanks to provide all the required info. Tell me the desired action" -ForegroundColor Green
DRSCTransfer
}
Collectdata
Function DRSCTransfer {
echo "Press 1 to transfer the file"
$choice = read-host "Enter your choice here "
if ($choice -eq 1){transfer}

}

Function transfer {
Get-Item "$source " | Copy-VMGuestFile -force -Destination "$dest" -VM $VM -LocalToGuest -GuestUser $user -GuestPassword $pass

}

#end here

Do try this and let me know if any issue.


Thank you,
Team vCloudNotes
,

Powershell | Modify password for user account inside GuestOS of a VM

Today I got this challenge and I did it in below way-

#Start here

$VC = Read-host "Enter your vCenter server name\IP "

Connect-VIServer $VC

$vmName = Read-host "Enter the target VM Name in vCenter "

$UN = read-host "Enter the target username "

$pswd = 'Password' #Enter password here which you want to set in '' mark

$Chpass = @"

`$securePswd = ConvertTo-SecureString -AsPlainText -String $pswd -Force

Get-LocalUser -Name $newUser | Set-LocalUser  -Password `$securePswd -Confirm:`$false

"@

Invoke-VMScript -VM TestVM -ScriptText $Chpass -GuestUser "$UN" -GuestPassword "Asdf@1234" -ScriptType Powershell | Select -ExpandProperty scriptoutput

#End here
Please note that -

"Asdf@1234" is existing password of the guestOS
In case any error, do let me know, will surely help you out


Thank you,
Team vCloudNotes

NSX | Bit about Firewall

Types of Firewall rules based on protocols and security layer-

General Rules - These rules are applied to the L3, L4 and L7 protocols and fields such as IP addresses, TCP\UDP port numbers and APP-IDs. In addition, vCenter attributes like datacenters and resource pools can be part of the group.

Ethernet Rules - These rules can define a set of MAC addresses as source or destination and enforce policy on L2 protocols. Ethernet rules are enforced before General rules.

Partner Security Services -These rules can define traffic flows to be redirected to partner solutions for additional network introspection.

Firewall rules are managed in centralized manner. Each traffic session is checked against the top rule in firewall table before moving down the subsequent rule in the table. The first rule in the table that matches the traffic parameter is enforced

Types of Firewall rules based on where and who creates them-

  • user-defined rules : rules created by administrators
  • Internal rules : Rules that enables control traffic to flow for NSX edge services
  • Local Rules : rules specific to NSX Manager instance(In cross vcenter NSX deployment)
  • Service Composer : rules created through service composer as a part of defined security policy
  • Default distributed firewall rules : rules that deals with traffic that does not match any rule 
  • Pre-rules: rules created for the NSX edge firewall through the centralized firwall tab. Pre-rules cannot be modified at the edge level
About Reject and Deny action of firewall
  • Reject action sends the following responses:
    • RST packets for TCP connection
    • ICMP unreachable host
  • Deny action silently drop the packet just like some RTOs
Applied To field of a firewall rule

There are total 12 objects\destination on which you can apply the rules, those are as below-
  1. Datacenter
  2. Cluster
  3. DvPortgroup
  4. Virtual Machine
  5. Resource Pool
  6. Security Group
  7. vAPP
  8. vNIC
  9. IP Set
  10. IP Address
  11. Logical Switch
  12. Legacy port group.
DFW Enhancement : L7 based enforcement

L7 Firewall also called context-aware security or next generation firewall. Context aware security is intended specifically for east-west cases. However there are no changes how components interact in the next generation firewalls-

* NSX manager talk to vcenter to fetch inventory with vCenter plugin
* If AD is integrated then NSX communicates with AD with AD plugin
*NSX manager sends rules to esxi host which is received by vsfwd installed in the host and then host send these rules to applicable components.

A few components now have additional responsibility
  • The Deep packet inspection module is now used to inspect APP-IDs.
  • Message bus agent creates filters, configure rules and integrate the above components to collect context
  • VSIP module installed on esxi host creates flows based on rules and redirect traffic to the DPI user world engine
  • vDPI daemon help find context
Below snippet will explain a lot in one go. Taken from VMware e-book.


Thank you,
Team vCloudNotes
,

[Update] Powershell

Hi Guys,

I am still working on the idea to create a Centralize tool for many vCenter Operational tasks with the help of powershell in a time efficient way. I have divided it into three category.

Get or Search Engine ....................In Progress
Set or operations Engine ...............To be initiated
Deploy and Automation Engine....To be initiated

Below is the updated glimpse of the work-


Please give your ideas to make it more exhaustive. I will share once all three steps will be completed.


Thank you,
Team vCloudNotes

NSX | How NSX provide more security to datacenters?

It secure the data center by addressing one of the key issues in traditional security solutions, which are as below-

1. NSX has visibility not only on virtual datacenter components like VM, ESXi host, portgroups but also within Guest-OS, application and its service hence secure SDDC not only from external attacks but also from within vulnerabilities. Here we know something known as Micro-Segmentation.

For example:
if once VM is infected with some viruses\malware or any other malicious software then NSX block the VM and don't allow it to infect other VMs. Below is reference snippet.
First image(from left) is for traditional datacenter and with traditional security.
Second image is with NSX


2. It don't need any in Guest Antivirus agent. Separate antivirus solution is not required if you have Guest-Introspection enabled with NSX. 

Explanation: I have 10 ESXi host in a cluster and 100 VMs. I'll just prepare my ESXi Host for NSX (Let me know if you want to know about this point) and then enable the Guest-Introspection on entire cluster. My all 100 VMs will be secured with enabled antivirus in Guest-Introspection in NSX.

3. Because NSX secure entire cluster so if a VM is vMotioned by DRS or restarted by HA on different host then also it will be secured.


Thank you,
Team vCloudNotes

vROPS | Custom Groups

It helps to group scattered VMs across multiple datacenters but belongs to same entity.

To elaborate,

Goal - I want to have a heatmap dashboard for all VMs of my client and in a single pane.
Challenge - My client's VMs are scattered around 4 data centers and in multiple folders and it is on vCloud Director platform. But vROPS will not be able to show the data in single pane of view because VMs are spread across and not in a single container.
Solution - Create Custom Group to monitor all those in a single pane of view. It will create a single container to give dashboard a source object to monitor and give the data.

Let's see how to do that...

My vROPS Version is 7.0.0.

Step 0: Login vROPS. Of course :)
Step 1: Click on "Environment" tab - Click on "Custom Groups" Under Groups and applications and then click on Green (+) icon
Step 2: Follow the below-

Name  - Type any name here. I will give it vCloudGroup
Group Type - Select the group where you want to place this group in. Here, many confuses. We can create a new "Group Type" as well or you can select existing "Group Type" if you want.
Policy - Select Default Policy, if you want know much about it.
Keep Group Membership up to date - Check the box

Now, Define the membership criteria-

Select the object type - We will select "Virtual Machine" here because our goal is around the virtual machine. If you have any other goal then it might change to host, datacenter, datastore etc..

Right below this option, I will click on drop down and will select the "Object Name". why?

Because for all the VMs, there is one thing in common that all have a specific word in their VM Name. My logic would be, "Bind all the VMs in this Group which has xxx in its name. got it?"

Next, I will select "Contains" and then "xxxx".

Now, you can click on okay but if you explicitly want any other VM of client, which doesn't have this xxx in its name then you can click on "Object to always include" or you don't want a particular VM to monitor then choose "Object to always exclude" and then click on save.

Now, search the Group Name "vCloudGroup" in vROPS search bar and will see all those VMs in it which has "xxx" in its name. It might take sometime to sync depending upon your environment size.


Feel free to put any question here!


Thank you,
Team vCloudNotes


Python | Web page automation with Selenium

Below example is to auto-login in web-page. Already there are lots of websites sharing the same but I would like to have all the info at one place(Because this is my vCloud Notes) :)

#Start here
from selenium import webdriver  #Install the selenium package
from selenium.webdriver.common.by import By
import time
import selenium, os, time
from selenium import webdriver
from selenium.webdriver.common.by import By
from selenium.webdriver.common.keys import Keys
from selenium.webdriver.common import keys
import pyautogui

baseUrl = "Enter URL here"
exepath = 'C:\\Python\\geckodriver.exe' # download and save geckodriver (for firefox)in this location. For chrome it is different one.
driver = webdriver.Firefox(executable_path=exepath)
driver.get(baseUrl)
time.sleep(7)
username = driver.find_element(By.XPATH, "//input[@name='username']").send_keys("gjohar")
password = driver.find_element(By.XPATH, "//input[@name='password']").send_keys("blablabla")
time.sleep(2)
#I applied below tweak to click on login button because in my situation, there was no ID or Class mentioned for login button.
pyautogui.hotkey("tab")
pyautogui.hotkey("Enter")

#End here.


Thank you,
Team vCloudNotes


NSX | MicroSegmentation

Micro-segmentation is a fancy term, basically it is kind of next level security provided by NSX. It is well known as "Micro" because it helps us to control the traffic flow even from a vNIC.

This Micro-segmentation basically we achieve by DFW that is Distributed Firewall.

Internet is already flooded with lots of articles and documentation on it. But here I will just simplify the things, but only for those who at least knows that what is NSX :)

How to apply it-

Step 0: Login vCenter server and go to Networking and Security plugin
Step 1: Create Security groups between which you want to apply the policy. It doesn't mean that it is possible only with security groups. You can apply the firewall policy between two VMs, portgroups, IP address, SGs, vAPPs etc. it is just and example.
Step 2: Create required firewall rules and apply on security groups
Step 3: It is done

Steps explained-

Let's say I want to apply security between APP and Web VMs.

I will create two Security Groups and will name them like SG_APP and SG_Web or anything you want.

Once done.

I will create firewall rules on the basis of below criteria.

Ex.1 - I want to block all the communication between WebServer1 and WebServer2 (Let's say I have multiple webservers)
Ex.2 - I want to allow all communication between web servers and app servers but only on port number 23
Ex.3- I want to allow all incoming connection coming toward web servers with any port number

In all the above rules, source and destination will be my Security Groups.

For example,

Ex.1
Source - SG_Web
Destination - SG_Web
Service - Any

Ex.2
Source - SG_APP
Destination - SG_Web
Service - 23

Ex.3
Source - Any
Destination - SG_Web
Service - Any

That's it!

Above is just an example and to explain the workflow. You can anyhow manipulate the security policies and firewall as per your requirement.

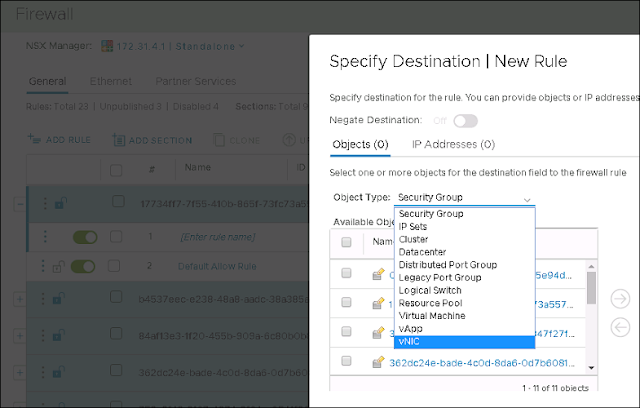
Below is an example that what can be in the source and destination list. As I said it give us option to select even a vNIC. Scroll down and you will get an idea.


Now let's think about one use case of, where we might need to select vNIC as a source or destination. I have a VM which is internet facing as well as it can access my internal network as well and of course have two vNICs (One is internet facing and second is intranet facing)

I don't want any traffic can go from my one vNIC to another vNIC.

Got an idea?

Still any doubt.Feel free to comment. I will answer it for sure..


Thank you,
Team vCloudNotes


vROPS | Health Check of cluster

Sometime we have to check the cluster health. In terms of database size, collected metrics size etc..

for that I have a script which gives you very beautiful view of each and every thing of all the vrops cluster nodes. Run the script and you see it by yourself.

Step 1: Login vrops master node with root
Step 2: Copy below script and paste in CLI interface of vROPS


 echo -e "\e[1;31mHOSTNAME:\e[0m" > $HOSTNAME-status.txt | hostname >> $HOSTNAME-status.txt;getent hosts | nslookup >> $HOSTNAME-status.txt; uname -a >> $HOSTNAME-status.txt; echo -e "\e[1;31mDNS CONFIGURATION:\e[0m" >> $HOSTNAME-status.txt | cat /etc/resolv.conf >> $HOSTNAME-status.txt; cat /etc/hosts >> $HOSTNAME-status.txt; echo -e "\e[1;31mVERSION INFO:\e[0m" >> $HOSTNAME-status.txt | cat /usr/lib/vmware-vcops/user/conf/lastbuildversion.txt >> $HOSTNAME-status.txt; echo -e "" >> $HOSTNAME-status.txt;cat /etc/SuSE-release >> $HOSTNAME-status.txt; echo -e "\e[1;31mDATE:\e[0m" >> $HOSTNAME-status.txt | date >> $HOSTNAME-status.txt; echo -e "\e[1;31mSERVICES:\e[0m" >> $HOSTNAME-status.txt | service vmware-vcops status >> $HOSTNAME-status.txt; echo -e "\e[1;31mCASA:\e[0m">> $HOSTNAME-status.txt| service vmware-casa status >> $HOSTNAME-status.txt; echo -e "\e[1;31mDISKSPACE:\e[0m" >> $HOSTNAME-status.txt | df -h >> $HOSTNAME-status.txt; echo -e "\e[1;31mHEAPDUMP:\e[0m">> $HOSTNAME-status.txt | ls -lrSh /storage/heapdump/>> $HOSTNAME-status.txt; echo -e "\e[1;31mIFCONFIG:\e[0m">> $HOSTNAME-status.txt | ifconfig >> $HOSTNAME-status.txt; echo -e "\e[1;31mCASADB.SCRIPT:\e[0m" >> $HOSTNAME-status.txt | tail -n +51 /data/db/casa/webapp/hsqldb/casa.db.script >> $HOSTNAME-status.txt; echo -e "\e[1;31mROLE STATE:\e[0m">> $HOSTNAME-status.txt | grep adminroleconnectionstring /usr/lib/vmware-vcopssuite/utilities/sliceConfiguration/data/roleState.properties >>$HOSTNAME-status.txt | grep adminroleenabled /usr/lib/vmware-vcopssuite/utilities/sliceConfiguration/data/roleState.properties >>$HOSTNAME-status.txt; echo -e "\e[1;31mGEMFIRE PROPERTIES:\e[0m">> $HOSTNAME-status.txt | grep locators /usr/lib/vmware-vcops/user/conf/gemfire.* >> $HOSTNAME-status.txt; grep bind-address /usr/lib/vmware-vcops/user/conf/gemfire.* >> $HOSTNAME-status.txt; grep shardRedundancyLevel /usr/lib/vmware-vcops/user/conf/gemfire.properties >> $HOSTNAME-status.txt;grep "serversCount" /usr/lib/vmware-vcops/user/conf/gemfire.properties >> $HOSTNAME-status.txt; echo -e "\e[1;31mPERSISTENCE PROPERTIES:\e[0m">> $HOSTNAME-status.txt | grep ^db* /usr/lib/vmware-vcops/user/conf/persistence/persistence.properties >> $HOSTNAME-status.txt; grep replica* /usr/lib/vmware-vcops/user/conf/persistence/persistence.properties >> $HOSTNAME-status.txt; grep "repl.db.role" /usr/lib/vmware-vcops/user/conf/persistence/persistence.properties >> $HOSTNAME-status.txt; echo -e "\e[1;31mCASSANDRA YAML:\e[0m" >> $HOSTNAME-status.txt | grep broadcast_rpc_address: /usr/lib/vmware-vcops/user/conf/cassandra/cassandra.yaml >> $HOSTNAME-status.txt | grep listen_address: /usr/lib/vmware-vcops/user/conf/cassandra/cassandra.yaml >> $HOSTNAME-status.txt; echo -e "\e[1;31mNODE STATE INFO:\e[0m">> $HOSTNAME-status.txt | $VMWARE_PYTHON_BIN $ALIVE_BASE/tools/vrops-platform-cli/vrops-platform-cli.py getShardStateMappingInfo | sed -nre '/stateMappings/,/}$/p' >> $HOSTNAME-status.txt; echo -e "\e[1;31mWRAPPER RESTARTS:\e[0m" >> $HOSTNAME-status.txt |find /usr/lib/vmware-vcops/user/log/ -name "*wrapper.log" -print -exec bash -c "grep 'Wrapper Stopped' {} | tail -5" \; | cut -d'|' -f3 >> $HOSTNAME-status.txt; echo -e "" >> $HOSTNAME-status.txt; echo -e "\e[1;4;35mPERFORMANCE RELATED INFORMATION\e[0m" >> $HOSTNAME-status.txt; echo -e "" >> $HOSTNAME-status.txt; echo -e "\e[1;31mvCPU INFO:\e[0m" >> $HOSTNAME-status.txt |grep -wc processor /proc/cpuinfo >> $HOSTNAME-status.txt; echo -e "\e[1;31mMEMORY INFO:\e[0m" >> $HOSTNAME-status.txt | awk '$3=="kB"{$2=$2/1024**2;$3="GB";} 1' /proc/meminfo | column -t | grep MemTotal >> $HOSTNAME-status.txt; echo -e "\e[1;31mTOP OUTPUT:\e[0m" >> $HOSTNAME-status.txt; /usr/bin/top -d 0.5 -n 1 -b | head -5 >> $HOSTNAME-status.txt; echo -e "\e[1;31mADAPTER TYPE OBJECT COUNTS:\e[0m" >> $HOSTNAME-status.txt; su - postgres -c "PGDATA=/storage/db/vcops/vpostgres/repl PGPORT=5433 /opt/vmware/vpostgres/current/bin/psql -d vcopsdb -c 'select count(*),adapter_kind from resource group by adapter_kind;'" | awk '{ SUM += $1; print} END {print "Total";print SUM }' | cut -d ':' -f 5 >> $HOSTNAME-status.txt; echo -e "\e[1;31mCASSANDRA ACTIVITIES:\e[0m" >> $HOSTNAME-status.txt | /usr/lib/vmware-vcops/cassandra/apache-cassandra-2.1.8/bin/./nodetool --ssl -h 127.0.0.1 --port 9008 -u maintenanceAdmin --password-file /usr/lib/vmware-vcops/user/conf/jmxremote.password  cfstats -H globalpersistence.activity_2_tbl >> $HOSTNAME-status.txt; echo -e "\e[1;31mALERT DB COUNT:\e[0m" >> $HOSTNAME-status.txt | su - postgres -c "/opt/vmware/vpostgres/9.3/bin/psql -d vcopsdb -A -t -c 'select count(*) from alert'" >> $HOSTNAME-status.txt; echo -e "\e[1;31mALARM DB COUNT:\e[0m" >> $HOSTNAME-status.txt | su - postgres -c "/opt/vmware/vpostgres/9.3/bin/psql -d vcopsdb -A -t -c 'select count(*) from alarm'" >> $HOSTNAME-status.txt; less -r $HOSTNAME-status.txt


Step 3: If you have any doubt on output of this script you can run in your test environment first. I use this script many times to check the health of vROPS.

Below snippet is taken after running this command. You will get more data by keep pressing the down arrow key in your vrops putty session (note here :D)


Thank you,
Team vCloudNotes