I used to get such requests from customers so I thought to share this one to web. Many of you might know this but I am sure that many will have benefit from this post.
My colleagues too requested to share this trick to get the edge gateway name which are connected to internet.
This sounds tricky but very simple. Try your thought before scroll down and comment :)
If not getting any idea then continue reading it. So, any edge gateway connected to internet through external network, right? and it has a name :) let's say in our case that name is InternetPG. I am assuming that you know the basic VCD stuff like what is the external network and how can we connect an edge gateway to the internet. If not then its time to start the study for the sake of new year. LOL!
Logic is, get the edge gateway name where connected external network name like InternetPG. Now, use this logic in powercli
Connect-CIServer mylabs.vcnotes.in #just to connect VCD Get-EdgeGateway | Where {$_.ExtensionData.Configuration.GatewayInterfaces.GatewayInterface.name -clike "InternetPG"} | Select Name, orgvdc | out-gridview
I like to take output in gridview, if you want, you can remove out-gridview in above command. You will have output like below one.
This is not a
general issue everyone faces but I have this issue in my platform and customer
used to report it after every few days. To help myself and team, I am creating
this blog but I will be glad if it help anyone out there.
Issue - Edge gateway
modification action failing repeatedly with below like error -
[
e0fe75fa-4eff-48d5-9d9a-73f0020a29d5 ] Cannot update edge gateway
"Edge-Gateway" - Cannot update edge gateway "Edge-Gateway"
- Could not execute JDBC batch update - Batch entry 0 /* Method: unknown */ /*
Method: unknown */ /* delete
com.vmware.vcloud.common.model.net.AllocatedIpAddressModel */ delete from
allocated_ip_address where id='5a6ee85c-f052-4ba5-b77f-b7932302b4df'::uuid was
aborted: ERROR: update or delete on table "allocated_ip_address"
violates foreign key constraint "fk_alloc_ip_gw_assigned_ip" on table
"gateway_assigned_ip" Detail: Key
(id)=(5a6ee85c-f052-4ba5-b77f-b7932302b4df) is still referenced from table
"gateway_assigned_ip". Call getNextException to see other errors in
the batch. - ERROR: update or delete on table "allocated_ip_address"
violates foreign key constraint "fk_alloc_ip_gw_assigned_ip" on table
"gateway_assigned_ip" Detail: Key
(id)=(5a6ee85c-f052-4ba5-b77f-b7932302b4df) is still referenced from table
"gateway_assigned_ip".
Observation -
Even
if you try to update the description, it fails with similar error. No update is
possible until and unless you resolve above mystery.
Resolution - It will be
fixed from VCD DB but if you are not that good in DB then I would suggest to
open a case with VMware. They will help you out for sure. They always keep on
saying that don't change anything in the DB by your own and we will fix it for
you. Leverage the support! :) But sometime, you have to fix the issue right now.
In that situation, this can help you. I am little good now in DB and know what
I am doing so I used to a lot operations in the VCD DB. It is up to you.
So, if you
read the error then you will come to know that the DB table
"allocated_ip_address" is having some issues with id "5a6ee85c-f052-4ba5-b77f-b7932302b4df".
Let's see what is this ID.
1. Login
primary vcd cell and then DB with below command
root@vcdcell01# sudo -u
postgres psql vcloud
1. vcloud=# select * from
allocated_ip_address where id='5a6ee85c-f052-4ba5-b77f-b7932302b4df';
You will have
output like below
-[ RECORD 1
]-+-------------------------------------
id
| 5a6ee85c-f052-4ba5-b77f-b7932302b4df
scope_id
| 72ead83f-7216-436b-a94f-43cd01aa534e
address
| 57.191.5.195
addr1
| 968820163
timeout
| 9999-12-31 23:59:59.997
last_modified
| 2020-03-06 15:54:51.327
state
| 1
Now run next
command in the DB only
2. vcloud=# select *
from logical_network where scope_id = '72ead83f-7216-436b-a94f-43cd01aa534e';
You will get
possibly below output
-[ RECORD 0
]-+-------------------------------------
Now you
need to find out that where this address 57.191.5.195 is configured. Simplest
way, as this error on a edge gateway so, go to edge gateway in GUI, browse to the
network and subnet and try to find this IP address which must be assigned to
one of the external network. Once you find it then run below command
3. vcloud=# select *
from logical_network where name = 'problematic_network_name';
Note that
problematic network is the name of the network which has the IP address
57.191.5.195. From above command you will have the ip_scope_id value. Note that
please.
Now to fix
the issue, please run below command.
4.vcloud=#
update allocated_ip_address set scope_id = 'ip_scope_id value, noted from
command 3' where id = '5a6ee85c-f052-4ba5-b77f-b7932302b4df';
Now once
updated, you will see that there is no more error on the edge gateway while
updating it.
Also, this is
one of the use case where you can have this issue. I myself know few more use
cases which are tough to explain in post.
If you have
such issue at your workplace and if VMware too struggle a lot about this, you
may try this or reach me out. I will try my best to help you in this situation.
This issue is mysterious issue where NSX's local account gets locked out not for login into NSX GUI but for API operations. Creating this blog because I couldn't find the solution on web. VMware article was there explaining root cause but solution was not there too.
Symptoms
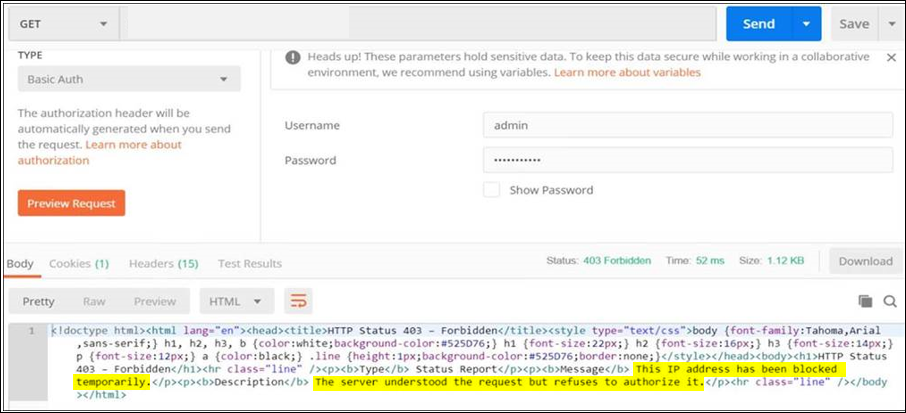
1) Any application or product which works with or uses NSX for network services, will not be able to use NSX to create, remove, update or deletion operations. However, running services will be running fine. 2) You will be able to login NSX portal but will not be able to use APIs. Not even through any other API tool like postman. You might get error like below
3) I uses VMware Cloud Director which uses NSX for networking and security service. On VMware Cloud Director, I could see error like below when you open any Edge Gateway or do any configuration change. Below are the VCD debug logs-
2021-07-12 16:18:52,955 | DEBUG | task-service-activity-pool-128 | NetworkSecurityErrorHandler | Response error: <!doctype html><html lang="en"><head><title>HTTP Status 403 – Forbidden</title><style type="text/css">body {font-family:Tahoma,Arial,sans-serif;} h1, h2, h3, b {color:white;background-color:#525D76;} h1 {font-size:22px;} h2 {font-size:16px;} h3 {font-size:14px;} p {font-size:12px;} a {color:black;} .line {height:1px;background-color:#525D76;border:none;}</style></head><body><h1>HTTP Status 403 – Forbidden</h1><hr class="line" /><p><b>Type</b> Status Report</p><p><b>Message</b> This IP address has been blocked temporarily.</p><p><b>Description</b> The server understood the request but refuses to authorize it.</p><hr class="line" /></body></html> | requestId=18cbd3bc-2eaf-42af-b11e-4bce957bff9e,request=POST https://testvcd.com/api/admin/edgeGateway/509ed27c-724d-490b-b0c7-e25d19523017/action/redeploy,requestTime=1626106731682,remoteAddress=172.25.1.21:60592,userAgent=Mozilla/5.0 (Windows NT 6.3; Win64; x64) AppleWebKit/537.36 (...,accept=application/*+json;version 34.0 vcd=632554b9-0779-4ddc-8b62-be08d1c167f6,task=82c8a4fc-35ba-490a-a235-b4a65a25cace activity=(com.vmware.vcloud.backendbase.management.system.TaskActivity,urn:uuid:82c8a4fc-35ba-490a-a235-b4a65a25cace)
4) I checked the NSX Manager logs and could see multiple events like below in /usr/appmgmt-webserver/logs/localhost_access_log.2021-07-13.txt.
Where localhost_access_log.2021-07-13.txt. This filename will change as per current date in logs.
Yellow - This is IP address which is trying to make a connection with NSX Manager which is failing
Red - This is error code 403 which means access forbidden
Above logs means, IP address (172.25.1.239) is trying connect with NSX Manager but NSX Manager is not allowing access to connect.
Root Cause
When any application (Monitoring or non-monitoring) is configured with incorrect username and password to connect with NSX Manager then as a security feature NSX Manager blacklist that username after certain invalid authentication attempts (by default it is 10 but can be modified). Any user too can do this because someone might be trying to guess the password! be aware of that too ;)
Solution
Before correcting it, you must identify which application or user is doing this. Because if post correction, if still invalid attempts are coming then it will again block the user account. How will you identify that's your headache but you can reach me out :)
Once identified then follow below steps
1. Login NSX Manager CLI with admin
2. enter into enable mode with commad
#enable
3. Enter into engineering mode with command↓
#st en
Press Y when asked and use password : IAmOnThePhoneWithTechSupport
4. then edit /home/secureall/secureall/sem/WEB-INF/spring/vsmconfig.properties and look for values as below in this file
#Denotes whether blacklisting is enabled blacklist.enabed=true
You will find it true.
5. To resolve this issue, first you need to make it false that is from
blacklist.enabed=true
↓
blacklist.enabed=false
and then save the file
6. Reboot NSX Manager now with below command
#reboot
7. Once rebooted, you will find that NSX account which you used for integration with other application and which was locked out is now responding over API requests and will give you output as below now.
8. In step 5, you have changed the blacklisting configuration which can be a security vulnerability. As soon as this issue fix, then you need to revert it back to true so that future invalid attempts gets blocked.
9. Post making it true, reboot NSX Manager. Please note that everytime you change it, you have to reboot NSX manager to make it effective.
Don't forget to comment if it was useful for you. Cheers!
You will find today's post more interesting because resolution of this issue is only documented as vcloud service restart. There are many posts on the web which says that in order to clean the stuck job in VMware Cloud Director GUI, you need to restart vCD services.
Today, I faced the same issue but I decided to find some other solution. For single VM, it is never a good idea to restart entire vcloud director services. isn't it?
Issue : Task is running since long in Cloud Director GUI and not timing out even after more than 6 hours
First, let me show you what exactly a long running job or stuck job means. Below is the task detail. In vCloud Director GUI, you will also see that particular tasks is running since long. Hope it is clear
Observation : Above job was running since last 6-7 hours. Earlier, I noticed that such job used to timed-out in around 4 hours which is default time out value for any vcd tasks but this one was stubborn job. Due to this, I couldn't perform any operation on VM other than power off and power on. From vCenter, there was no such issues so this was clearly a VMware Cloud Director issue
Solution :
1. Login primary cell with root account and then login DB (if embedded. In case of external DB then login directly DB server).
2. Run below command to see the stuck task
select * from organization where name = 'org_name';
It will give you org_id. note that down.
3. Now run below command by using org_id you got in 2nd command.
select * from task where org_id = 'org_id';
It will show you the task name, job id (as in above snippet), which will confirm that this is the right task to cancel. Generally you will see this stuck task only but if you see many then search with job id rather than org_id. If you don't understood this line then, comment box is yours.
4. Now execute below command to delete this task from DB. Take backup first please!
Delete from task where org_id = 'org_id';
Stuck task has been deleted from DB now. Doing all above operations doesn't require any downtime so go ahead without any fear!
Since the beginning of HTML5 interface of VMware Cloud Director there are some major issues with portal and the DB. Today I am going to give you fix for one of those issues for which many people over the globe are finding the solution. Few people are not getting solution from even VMware as per my discussion in VMware community. Knowing the fact that I got this fix from VMware but still I found many people struggling due to this. So, I thought that I should create a web record of this issue.
Symptoms\Observation :
1. When you click on external network page in cloud director /provider page and browse all pages one by one, one of the page will keep on trying to browse but will fail with timeout
2. When you apply filter and search that external network tool, your search will end with timeout with no result
3. When you try to add problematic network into your vapp then it will always fail to add and will give you weired errors.
4. This network can be external network or org network or vapp network
5. Edges where problematic network is attached will intermittently loss the network packet or total loss also can be there.
Basically, you will feel that network is broken and you can't see or edit that problematic or broken network in vCD GUI at all.
Reason :
This is happening because ip_scope_id value in the cloud director DB for that particular network has become null.
Resolution :
1. If you too facing similar symptoms with your network then run below command to confirm that your network is having same issue. This command needs to run in Cloud director DB which can be postgres or SQL. Command is same in both the DB flavor-
select * from logical_network where name = 'problematic_network_name';
Below is the example output
In above snippet, I depicted clearly that where is the issue. Now, if you too see that ip_scope_id is null for your network too then run next command.
2. To solve this, we need to know ip_scope_id value and then insert in above table. to get the value run below command. Only thing to notice here in below command is, you need to change the logical_network_id value. This value you will get from first command. Copy that value and put that in below command and run it. There will be no impact of doing this as this is just get command.
select * from ip_scope where id in (select scope_id from allocated_ip_address where id in (select allocated_ip_address_id from gateway_assigned_ip where gateway_interface_id in (select id from gateway_interface where logical_network_id = 'db62f356-2f24-48b4-a841-87512e720f65')));
You will have below sample output-
ID, in above snippet is your ip_scope_id. Now when you have this let's insert it in logical_network table.
Before doing this, take the backup of your DB. If you have embedded DB then use the command
#/opt/vmware/appliance/bin/create-db-backup
Once backup is done then let's insert it by running next command
3. From 1st and 2nd command you have the logical_network_id and ip_scope_id respectively. Replace both ids in below command and then run it.
insert into logical_network_ip_scope(scope_id,logical_network_id) values('eb578ab9-2f4b-49c6-8fa6-4cd25472a1bf','5149b5ef-fc53-453d-a59d-a6f349624307');
Warning : If you are not well versed or if you are not understanding what is happening here then take help of VMware to understand or you can comment here I will help you out for sure.
Once above command is done, you will see that the network is now visible in the VCD GUI, you can find the network in the portal. Edge or vapp which are connected to this network are behaving good now.
4. Now, again run the first command and see if you have the ip_scope_id value now. This should be in-place but there are 1% chance that it is still not showing there but issue is resolved. To fix it, run below command-
update logical_network set ip_scope_id = 'd0953b40-3426-44af-a719-349b1245b3de' where id = '7353056c-2ba9-4ee0-9f75-631b3f0be77f';
Now, I think I can hope that you know what to change in above line before running it. If any doubt then I am not far from your guys. Feel free to comment.
I am creating a post on the subject because there is no clear cut article on this on web or might be I couldn't find straightforward process to do this. Basically, in vCD GUI there is option to disable or enable the auto-discovery for entire vCD system. On org level you cannot disable or enable auto-discovery but you can override this setting on OrgvDC level but with the help of Admin APIs. Hope you know about APIs but what is Admin APIs. This will automatically be answered in this post. Read this post carefully and I hope you will understand this. To know more about auto-discovery, you can check out this post by Tom Fojta.
How to connect
You cannot even check the auto-discovery status for OrgvDC from GUI. You need to use the API. I have already covered this in my previous posts to connect vCD in API tool. Have a look here
How to check existing setting
Once you are connected then Use below api query to extract your Org detail
1. GET https://vcloud_ip_or_fqdn/api/org
Now, copy entire output and paste into notepad++ or any other text editor you want. Search for Org name where your orgvDC was created. Search in the notepad++ file only. You will get href link from there. Copy that link and paste it in API tool and send GET command. Example is shown below
2. GET https://vcloud_ip_or_fqdn/api/org/a038859f-bf22-4d64-b6dc-e1cb8fdf2fbc"
Now, you will get OrgvDCs list in this org. Copy entire output again and paste it into notepad++ again. Search target OrgvDC name and copy the href for that OrgvDC. Below is the example-
Note that if you run the GET command with adding "admin" then only you will get the auto-discovery option in output. Below is the example command and output with "admin" keyword-
Note that, if any OrgvDC output is not having this line that's mean it is following the vDC global level setting and to override this value by adding this line here. I will explain how.
Flase means VM auto-discovery is disabled and true means it is enabled. I explained you the process to get the value to Vm Auto Discovery status for OrgvDC. Now let's how to change this value.
How to update existing setting
To update this value from false to true or true to false or even enter the whole line here, you need to follow below steps
1. From above steps 3, you got orgvDC href value where you send GET query to get the auto vm discovery states, now you replace GET command with PUT command
2. Now, in the output for OrgvDC which you copied into notepad++, If vmDiscoveryEnabled is false and you want to make it true then change the keyword from false to true and vice-versa.
3. Copy entire output again after changing the value and paste it in the BODY, select RAW and select xml as shown in my previous post.
4. You will not click on send button now, you need to add one more header here along with other placed headers. Header info is given here and practical use below. For this reason only, I had to create an entire post. This is not clearly mentioned on any article on web so now you have one.
In case, you want to use JSON then you can use that too but make sure then JSON must be selected in body where you pasted the data from notepad++.
Once you put the content-type then make sure you have entered the right vDC href and selected operations in PUT and not GET.
Now hit the send button.
You will get message "202 Accepted" if all went good.
This post is to share the process to change the existing available protocols in NSX-v Edge firewall rule (Not DFW). Available protocols are TCP, UDP, ICMP and Any on vCD's Edge Service Gateway page. See below image.
My customer's demand was to set another protocol here which is ESP. I checked on GUI and it was clear that it is not possible from here so I could change it successfully from API queries.
How to connect
Before updating this firewall rule field, we must know that how to connect vCloud Director in any API tool. You can use Postman, Insomnia, ARC (Advance Rest Client) as a tool to connect vCD. You might need to disable SSL check before executing any api call. Below snippet is from Postman API tool.
Once that SSL check is disabled then 1. Set Authorization as Basic Auth. See below image
2. Set header as mentioned below Accept application/*;version=32.0
Version can be according to your vCD version.
3. Now create api query like https://vcloud_ip_or_fqdn/api/sessions and select POST in query type. It will be like POST https://vcloud_ip_or_fqdn/api/sessions This query is to get authorization and access token. Once you entered the URL and selected query type as POST then hit "Send" button to run this query. Post run you will get "200 OK" and authorization and access token headers. See below images
Use above two headers as shown in below images
Now, you are ready to do any operations in vCD using this API tool
How to extract edge firewall rules config
Use below api query to extract your Org detail
1. GET https://vcloud_ip_or_fqdn/api/org
Copy the output and paste in Notepad++. Search for target OrgvDC name where your edge is residing. Then create another query and run it
2. GET https://vcloud_ip_or_fqdn/api/vdc/a038859f-bf22-4d64-b6dc-e1cb8fdf2fbc"
You will see similar output in your Notepad++ data. Just copy vdc href from notepad++ file not from here and paste in Postman and then hit send
Here, you will have another output from OrgvDC. Search here the edge name. You will get line like below. Copy that line similar below and run another query https://iaas-sin.aticloud.aero/network/vdc/a038859f-bf22-4d64-b6dc-e1cb8fdf2fbc/edges Now, create a API call like
3. GET https://vcloud_ip_or_fqdn/network/vdc/a038859f-bf22-4d64-b6dc-e1cb8fdf2fbc/edges
It will give you output like below. Only single line.
It is three step process from version 9.5 to version 10.1.2. I would suggest to complete pre-requisites properly and it will be flawless process. You should check inter-operability first so that your other components can function with vCD versions you will be upgrading to. My experience says that during migration, first deploy the primary node → Transfer the DB → Replace custom certificates with self-signed certificates → Make sure your primary node up → Now add more nodes if you want to deploy multi-cell architecture → Change certificate.ks in standby nodes.
When we talk about Primary and standby nodes then it is only for Postgre DB which is active only on Primary node and will be Standby in standby nodes. VMware-vcd service will always be active-active in all three nodes (If you deploy minimum three nodes in multi-cell architecture). See below image.
Upgrade path will be-
Current 9.5 in-linux → In-place upgrade to 9.7 in-linux → Migrate to 9.7 appliance → Upgrade to version 10.1.2 appliance. You can check vendor doc for this upgrade path. Now when you know the workflow then let's proceed for planning phase.
Planning
First of anything, you should check the interoperability of your product versions. Click here for VMware InterOperability guide
You need to plan your upgrade as per this guide. This phase is most important phase, I must say. If you plan with perfection then very less chances of failure are there. Let's see what all you need to plan- In-place upgrade is quite simple. There is no such complexity. All planning need is for Migration from in-linux to appliance 1. IP Addresses There are two choices we have. You need to decide whether you want to change the existing IPs of existing vCD cells or you want to use new IPs on your new vCD cells. Why? Because you are going to deploy new cells for migration to appliance. I will describe in next steps. I used the existing IPs of existing cells. In case, you are using same IP addresses then
1. at the time of 9.7 appliance deployment you need to change the old cell's IP address to any temp but reachable IP address. This IP address should be reachable to your new cell as well as your existing external DB server. why? Because
1.1. This old cell IP address we will assign to new vCD cell's eth0 NIC
1.2. We still need old vcd cell (anyone) for DB migration that's why it must be reachable to new cell and your external DB server
2. You need to free IPs from all of your old three cells so that we can assign same three IPs to all three new 9.7 appliance node's eth0 nics.
3. You need to change DNS entries for you old cells with new temp IPs and then create DNS (Host and PTR records) for new cells with old IP addresses. Any confusion? comment pls.
4. You need to create different VLAN for IPs of eth1 of all three new vcd cells, if you already don't have it.
2. Network Route It is quite crucial part of this migration. In old vCD cells there used to be three different NICs holding different traffics like HTTPS, VMRC, NFS etc. but in vCD 9.7 appliance, each cell will be having two NICs only holding these services. You need to ensure that both these NICs must be on different VLANs\subnets. Now, you need to ensure that your new vCD cells's eth1 can reach your NFS server and for that if require you need to configure static routes as per your network flow. 3. Single cell or Multi cell Architecture You need to decide and plan your upgrade according to this point. Additional points to be taken care are
- Check out Load-balancer configuration. It might needs to modify post vcd 9.7 deployment.
- Do you have more than one LBs that balanced different traffics. For example, Internet and Intranet - You need to deploy additional nodes at very last stage that is after certificate replacement and making first node fully up
4. NFS
NFS is another critical part of this migration. Some guys might have NFS on Linux Machine, some might have on Windows and some might have it on direct storage box.
You need to make sure that while deploying first Primary node in version 9.7 appliance, NFS mount point must be empty otherwise 9.7 deployment will fail. You need to ensure that you NFS server must be reachable from the eth1 NIC of all vcd nodes in 9.7 appliance deployment.
I guess, I have given enough clues to help you plan this migration. Now, let's see all steps one by one.
In-place upgrade from 9.5 to 9.7
Pre-requisites - Make sure that upgrade.bin file is uploaded in any directory in vCD cell(s) and user has enough permission on it.
- Do a md5sum check. Command is
# md5sum installation-file.bin
Main activity You need to run all below command on all vcd cells one-by-one
Step 1 : Stop vCD services on all cells using ./cell-management-tool
To see the current status ./cell-management-tool -u administrator -p 'password' cell --status To stop coming more tasks on it ./cell-management-tool -u administrator -p 'password' cell --quiesce true To put it in maintenance mode
Step 3 : Take full backup of external MS SQL database
Step 4 : Take ownership on downloaded .bin file. Command is
#chmod u+x installation-file.bin
Step 4 : Install the upgrade file now
#./installation-file.bin
If you have placed .bin file in /tmp folder then change the location in CLI and then run the command It is a simple one. No such complexity.
Best Practices for next migration
1. Segregation of traffic should be as below. I did it like this so sharing it as my personal recommendations. You can chose other way round as well.
vCD 9.7 appliance eth0 eth1
Primary HTTPS+VMRC+API PostgreDB+NFS
Standby HTTPS+VMRC+API PostgreDB+NFS
Standby HTTPS+VMRC+API PostgreDB+NFS
2. If primary is deployed as "Primary-Large" then all standby cells must be deployed as "Standby-Large". If primary is deployed as "Primary-small" then all standby cells must be deployed as "Standby-small".
3. In multicell architecture, standby cells should be deployed at very last stage that is after making first cell up and running fully functional and after replacing the certificates. It will make things simple.
4. Both NICs of vcd 9.7 appliance cells must be on different VLANs
Migrate from ver 9.7 In-linux to 9.7 appliance
Pre-requisites 1. Clean and accessible NFS mount share. Must be accessible from eth1 nic if you are planning to transfer NFS traffic to eth1. I did the same.
2. Accurate DNS entries for new vcd cells with old IPs (If you don't plan to change the existing IPs)
3. If you have customized certificates then have passwords of keystore, https and console proxy.
4. Make sure that network flows are opened between new vcd cell's eth1 nic and old cell. Follow vcd 9.7 Install guide attached in last of this post 5. Configure AMQP with version 3.7
6. Here is the vendor documentation for all pre-requisites
7. Your production downtime will start when you will change the production IP of old vcd cell here. We will assign this IP to new primary cell.
Start the vCloud Director Appliance Deployment : Primary Node
1. Start deploying an ova as usual. A wizard will open → Give vCD cell a valid name → Give it folder location → Compatible datastore → Underlying ESXi host → Select eth1 and eth0 portgroups → Click next to complete customized template wizard →
Under Customized template, fill the following-
NTP Server to use: 8.8.8.8
Initial Root Password: VMware1!
Expire Root Password Upon First Login: uncheck
Enable SSH root login: check
NFS mount for transfer file location: IPaddress:/sharename
'vcloud' DB password for the 'vcloud' user: VMware1!
Admin User Name: administrator
Admin Full Name: vCD Admin
Admin user password: VMware1!
Admin email: vcd97@vcnotes.in
System name: vcd4
Installation ID: 12
eth0 Network Routes: blank
eth1 Network Routes: blank
Default Gateway: 172.17.2.1
Domain Name: vcnotes.in
Domain Name Servers: 8.8.8.8,8.8.4.4
eth0 Network IP Address: 172.17.2.21
eth0 Network Netmask: 255.255.255.224
eth1 Network IP Address: 172.17.2.22
eth1 Network Netmask: 255.255.255.240
You need to modify above detail as per your environment. Few doubts you might have-
System Name - For first primary node, you can put vcd1 Installation ID - In case of Brownfiled setup, note the installation id from running setup and put same here eth0 and eth1 Network - It is to put static routes according to your network design
Once all info is given, review it and click on Finish.
1. You need not to change installation ID on each and every standby cell. Installation ID is the ID which vCD uses to generate unique mac addresses for vCD VMs. I have seen few blogs asking to change it for standby nodes. This is totally incorrect.
2. Domain Name and Domain search path will be same as vcnotes.in. It should not be like vcdcell01.vcnotes.in. When you put the VM name at starting of deployment then DNS automatically generate FQDN.
Post-Checks-
1. Once ova deployment is finished then access SSH. If SSH is not responding the access console and start sshd service. Service sshd start. Check below logs to ensure everything is good.
#cat /opt/vmware/var/log/firstboot
#cat /opt/vmware/var/log/vcd/setupvcd.log
#cat /opt/vmware/var/log/vami/vami-ovf.log
If everything went well during deployment then firstboot logs will show you the success mark otherwise it will refer to check setupvcd.log and then vami-ovf.log
2. Browse VAMI interface https://IP_FQDN_of_primary_cell:5480. It should be like below
3. Browse https://IP_FQDN_of_primary_cell/cloud and https://IP_FQDN_of_primary_cell/provider. All portals will be accessible and without any error
Start the vCloud Director Appliance Deployment : Standby Node
Not Now :)
Once your primary cell is deployed then don't deploy standby node right after. Now, its time to transfer the DB.
Take backup of internal embedded postgres database
#/opt/vmware/appliance/bin/create-db-backup
Configure External Access to the vCloud Director Database
1. Stop vCD services on all cells including one primary and old three cells.
2. SSH to new vcd cell and create a file with name external.txt in /opt/vmware/appliance/etc/pg_hba.d with below command
Note that : IP address 172.25.2.194/32 is IP address of you old external DB server with CIDR value. IP address 172.25.2.209 is the IP address of eth1 NIC of old vcd cell. Refer to Page number 82 and 83 in vcd 9.7 Install guide attached in last of this post.
You can ensure proper update of above created file by checking file pg_hba.conf. Just run #cat pg_hba.conf and it should show the entries you just made in above steps
3. SSH to old vcd cell and run below command. Refer to vCD 9.7 Install guide page number 122.
eth1_IP_new_primary -It is eth1 IP address of new primary vcd appliance cell database_password_new_primary - it is the database password given while deploying the primary vcd node
-dbname - It should be vcloud only if you haven't changed intentionally.
/ - Many get confused with this /, it is just in VMware documentation which means next line. Doesn't matter if you use it or not.
Rest info should be understood and can be used as it is. If all went well then it will transfer your external SQL DB to embedded postgreSQL.
Transfer Certificates from Old Cell and Integrate it to New Primary Cells
1. On the migration source copy all the following files from old vcd cell to new vcd cell. Do not edit any entries in these files in this process. Use WinSCP to move the files between the two devices. Rename the file to cerificates.ks.migrated to avoid any confusion before paste it into new vcd cell.
Here, you have transferred all the certificates from old to new cell and now this is the time to run configure command so that new vCD primary appliance can use these certificates.
6. Below is the command.
Before this, note that /opt/vmware/vcloud-director/certificates.ks (Customer certificate copied from old cell) is not in use because we have renamed it with certificates.ks.migrated. We will do all initial configurations with self-signed certificates and then will use custom certificate in last step.
5. Run the configuration tool to import the new certificate.
/opt/vmware/vcloud-director/bin/configure
If asked “Please enter the path to the Java keystore containing your SSL certificates and private keys:” enter the location you uploaded the file to. If our case: /opt/vmware/vcloud-director/certificates.ks. It will ask about https, console proxy and keystore password. Supply all.
Press Y wherever it prompt and You are Done!!
You need not to start vCD service manually now. It will automatically started.
Check the /cloud, /provider and :5480 portals and make sure it is accessible well from intranet and internet environments.
Some Useful Commands for HA Cluster Operations-
I am making it smallest font size to avoid any confusion in command. These are show commands and you can run to have deep inside of vCD HA cluster status.
sudo -i -u postgres /opt/vmware/vpostgres/current/bin/repmgr -f /opt/vmware/vpostgres/current/etc/repmgr.conf node status
sudo -i -u postgres /opt/vmware/vpostgres/current/bin/repmgr -f /opt/vmware/vpostgres/current/etc/repmgr.conf cluster show
systemctl status appliance-sync.timer #It is to check the time sync between all the nodes and need to run on all nodes seperately
Start the vCloud Director Appliance Deployment : Standby Node1
1. All process to deploy standby node is same except
- You will only seed info which is applicable for standby node at the time of deployment
- You just need to transfer Certificate.ks file to its default location and no other certificate replacement is required on standby node
Start the vCloud Director Appliance Deployment : Standby Node2
Same as above no change.
If everything goes well then in /cloud or /provider interface, you will see all three nodes with green ticket icon.
Now, All nodes are deploy in vCD. In mulit-cell deployment only one or two steps are additional here.
Load-Balancer Configuration : You need to check your existing load balancer configurations and need to modify them if require. If your load-balancer was already configured with in-use IP addresses then you just need to change in-use port from 443 to 8443. For me, LB was configured in NSX for internal traffic and F5 was there to entertain Internet traffic.
Would like to share some issues which I encountered during migration
Known Errors during above deployment and migration
Listing down where I was stuck Issue 1: After deployment of first node, I got below error on VAMI interface The deployment of the primary vCloud Director appliance fails because of insufficient access permissions to the NFS share. The appliance management user interface displays the message: No nodes found in cluster, this likely means PostgreSQL is not running on this node. The /opt/vmware/var/log/vcd/appliance-sync.log file contains an error message: creating appliance-nodes directory in the transfer share /usr/bin/mkdir: cannot create directory ‘/opt/vmware/vcloud-director/data/transfer/appliance-nodes’: Permission denied. Solution : It means that NFS was not clean and PostgreSQL service couldn't be running. If you check above mentioned firstboot and setupvcd.log files then you will have idea. Delete all the content of NFS share and delete the existing node and retry deployment. No other fix. Issue 2: sun.security.validator.ValidatorException: PKIX path validation failed: java.security.cert.CertPathValidatorException: signature check failed. These were the log entires in cell.log and portal was not up Solution: Edit the global.properties file in new primary cell and comment out (#) three lines which are associated with ssl connection and run configure command /opt/vmware/vcloud-director/bin/configure --unattended-installation --database-type postgres --database-user vcloud --database-password db_password_new_primary --database-host eth1_ip_new_primary --database-port 5432 --database-name vcloud --database-ssl true --uuid --keystore /opt/vmware/vcloud-director/etc/certificates.ks --keystore-password root_password_new_primary --primary-ip appliance_eth0_ip --console-proxy-ip appliance_eth0_ip --console-proxy-port-https 8443 If it doesn't work then run below command /opt/vmware/vcloud-director/bin/configure --unattended-installation --database-type postgres --database-user vcloud --database-password db_password_new_primary --database-host eth1_ip_new_primary --database-port 5432 --database-name vcloud --database-ssl false --uuid --keystore /opt/vmware/vcloud-director/etc/certificates.ks --keystore-password root_password_new_primary --primary-ip appliance_eth0_ip --console-proxy-ip appliance_eth0_ip --console-proxy-port-https 8443 It will work for sure as worked for me twice Again run below command now /opt/vmware/vcloud-director/bin/configure --unattended-installation --database-type postgres --database-user vcloud --database-password db_password_new_primary --database-host eth1_ip_new_primary --database-port 5432 --database-name vcloud --database-ssl true --uuid --keystore /opt/vmware/vcloud-director/etc/certificates.ks --keystore-password root_password_new_primary --primary-ip appliance_eth0_ip --console-proxy-ip appliance_eth0_ip --console-proxy-port-https 8443 Issue 3: DB transfer was failing, I couldn't capture the error but it was giving old cell's IP address error Solution : When you prepare /opt/vmware/appliance/etc/pg_hba.d/external.txt file, I mentioned to put IP address of external DB so here you need to put IP address of your old cell as mentioned in above steps. In my case, I had to put IP address of eth1 nic of old cell Issue 4: vCD Portal was up from internet and Intranet but VM's console was not accessible from Internet. Solution: You need to make sure that in multi-cell deployment if you are using more than one LB then you will change the new cell's IP address in all LB configuration. In my case, Internet facing LB configuration change was missed so when we corrected it was resolved.
Upgrade from version 9.7 appliance to Cloud Director 10.1.2 appliance
Prerequisites
Take a snapshot of the primary vCloud Director appliance.
Log in to the vCenter Server instance on which resides the primary vCloud Director appliance of your database high availability cluster.
Navigate to the primary vCloud Director appliance, right-click it, and click Power > Shut Down Guest OS.
Right-click the appliance and click Snapshots > Take Snapshot. Enter a name and, optionally, a description for the snapshot, and click OK.
Right-click the vCloud Director appliance and click Power > Power On.
Verify that all nodes in your database high availability configuration are in a good state. See Check the Status of a Database High Availability Cluster.
Procedure
In a Web browser, log in to the appliance management user interface of a vCloud Director appliance instance to identify the primary appliance, https://appliance_ip_address:5480.
Make a note of the primary appliance name. You must upgrade the primary appliance before the standby and application cells. You must use the primary appliance when backing up the database. Note: You must upgrade primary cell first.
vCloud Director is distributed as an executable file with a name of the form VMware_vCloud_Director_v.v.v.v- nnnnnnnn_update. tar.gz, where v. v. v. v represents the product version and nnnnnnnn the build number. For example, VMware_vCloud_Director_10.0.0.4424-14420378_update.tar.gz.
Create the local-update-package directory in which to extract the update package. #mkdir /tmp/local-update-package
Extract the update package in the newly created directory. #cd /tmp #tar -vzxf VMware_vCloud_Director_v.v.v.v-nnnnnnnn_update.tar.gz -C /tmp/local-update-package
Set the local-update-package directory as the update repository. #vamicliupdate --repo file:///tmp/local-update-package
Check for updates to verify that you established correctly the repository. #vamicli update --check You will see similar output, if all went well
Shut down vCloud Director by running the following command #/opt/vmware/vcloud-director/bin/cell-management-tool -u <admin username> cell --shutdown OR #Service vmware-vcd stop You can use either way to stop vcd services
Apply the available upgrade #vamicli update --install latest
Note: Follow all above steps on all cells one by one and restart each cell too after upgrading the application. Now login on Primary Cell only and upgrade the database schema
From the primary appliance, back up the vCloud Director appliance embedded database. #/opt/vmware/appliance/bin/create-db-backup
From any appliance, run the vCloud Director database "upgrade" utility. #/opt/vmware/vcloud-director/bin/upgrade
Reboot each vCloud Director appliance #shutdown -r now
I will now share what is not there on vendor article-
1. Post application upgrade and login in html interface of vCD 10.1.2, you might notice that vCenter is showing disconnected and is not connecting post reconnect and refresh option. In that case, you need to follow below steps-
Login to primary cell with root
Run below command to accept the certificate (Issue is with certificate exchange of new vCD version 10.1.2 and needs to accept)
For more info, refer the URL https://kb.vmware.com/s/article/78885
2. Post upgrading vCD application, postgres service might stop and while upgrading the database schema, you may see error, "unable to establish initial connection with database". To resolve this, either start the service manually or reboot the cell once.
2. Above guide has all detail but just in case, if you need something specific. Here is Certificate replacement guide from VMware 3. Here is the database migration steps from VMware and same is mentioned in guide number 1. 4.Awesome article written by Richard Harris for the same process. Must check. I too learned from his experiences