Showing posts with label API. Show all posts
,

How to redeploy edge transport node in NSX-T(KB#00106)

 Hello Guys,

We all know that "How to redeploy the edge gateway in NSX-V" or "How to change the form factor of NSX-V edge from small to medium or large" but how many of you knows how to do it in NSX-T?

I am sure, till now few are in assumption that it is not relevant to NSX-T (at least first part) 😊

It is well relevant and we do redeploy edge nodes in NSX-T too. In this post I am giving you the method to not only redeploy it but also to change the form factor very easily. I gone through web before I did it by myself and could see very complicated process to replace the exiting node with the newly deployed node.

That might be relevant in some other scenario but my initial issue or goal was to change the existing edge node form factor from Medium to xLarge. So, I used API and it worked just perfect!.

Here you go.

Step1 - Connect the NSX-T using API. #If you don't know how then use comment box.

Step 2 - Use the API call 

GET https://10.112.152.10/policy/api/v1/transport-nodes    #It will give you the detail of all edge nodes

Step 3 - Pick the ID of target edge node from the output of step 2 and run the command as below

GET https://10.112.152.10/policy/api/v1/transport-nodes/7b60f554-a36f-4c71-9d6c-fddf7826da8a

You will get output something like below


Step 4 - Find the form factor parameter in output of step3. You will see like below-


If you have something else configured here then you will find like MEDIUM or SMALL or LARGE. You can change it as per your requirement and copy the entire output what you got in step 3 and paste in the API tool's body in Raw and JSON format.


Step 5 - Now, use below API call to change the form factor

POST https://10.166.171.198/policy/api/v1/transport-nodes/7b60f554-a36f-4c71-9d6c-fddf7826da8a?action=redeploy

it will start the redeployment and will take around 5-15 minutes or more depending upon your infrastructure.

Background process behind all the task is-

1. It put the target node in maintenance mode

2. Power off and remove the node

3. Deploy the new node with modified form factor or any other modified parameter and power it on

4. Register the node in NSX-T database

5. Configure everything as it was before

6. Exit the maintenance mode from new deployed node


Hopefully you could understand the whole process but if any doubt, please use the comment section. I will try my best to reply.


Thank you.

, ,

Delete an object in VMware Usage Meter (KB#00101)

Hello Guys,

If you ever got stuck with any issue with VMware Usage Meter then you might know that there are not enough troubleshooting KBs from VMware or enough troubleshooting articles on it. I too got stuck in one issue and couldn't find any article which could help me. I raised a SR too but it was pending since weeks without any support from VMware Support team. 

I continued to work on it and finally could resolve it by my own hence thought to create a KB here on vcnotes.in.

Issue : Duplicate entry found of same vcenter server through two different vROPS instances. Now need to delete vROPS server from usage meter from product page (Usage Meter Version 4.4). In my case, I didn't want three vROPS entry here and want to delete one which is bringing in the duplicate vcenter entry. This KB will help you to understand how to delete any product from product list in usage meter.

Roadblock : There is no option to delete the vROPS product in version 4.4's GUI. Please note that this version comes with HTML5 interface. In flex interface you could do it but in HTML5, there is no such option for vROPS. Reason is, Usage meter pick vROPS from vCenter MOB extension. I was having below kind of state. I had to change the snippet with vcenter name.


You can see that in vRealize operation page there is a vcenter named vcenter2.vcnotes.in is showing against two different vrops nodes that are 172.17.1.238 and 172.17.1.239. 

This is a mess and we need to clean this up. I want to delete the entry against 172.17.1.239 but there is no option to delete. 

Solution : Solution is to use API.

1. Connect Usage Meter in API tool as explained below

Query -

Header -

Credentials -


Once you entered the filed as above, hit the send button, it will give you output like below

Note that in above snippet you have message "202 Accepted", means you are logged in now. Also, you have sessionid in Body. It will be used as a header for further work. Let's check further.

Now, the requirement is to delete the product. Use below delete query-

DELETE https://172.25.2.198/api/v1/product?id=8&productType=VROPS&forget=true

Where 

api call is -  https://172.25.2.198/api/v1/product

id - this is the prdouct ID, well visible in the HTML5 web page when you login in usage meter

product tye - it is to mention that the product you are trying to delete is vcenter, vcd, vrops or something else

forget - it is to delete the history and for full cleanup. You should always use it.

Headers will be - 

Accept : Application/json (used earlier)
session id : extracted after login in above steps

Once you have given all the required parameters, hit the send button and targeted product will be delete from VMware Usage meter UI page.

Now when you read above stuff, you should be able to understand this VMware documentation for more information on API operations with VMware usage Meter. 

Thank you.

, , ,

unlock NSX local accounts for API Operations (KB#00100)

Hello Guys,

This issue is mysterious issue where NSX's local account gets locked out not for login into NSX GUI but for API operations. Creating this blog because I couldn't find the solution on web. VMware article was there explaining root cause but solution was not there too.

Symptoms

1) Any application or product which works with or uses NSX for network services, will not be able to use NSX to create, remove, update or deletion operations. However, running services will be running fine.
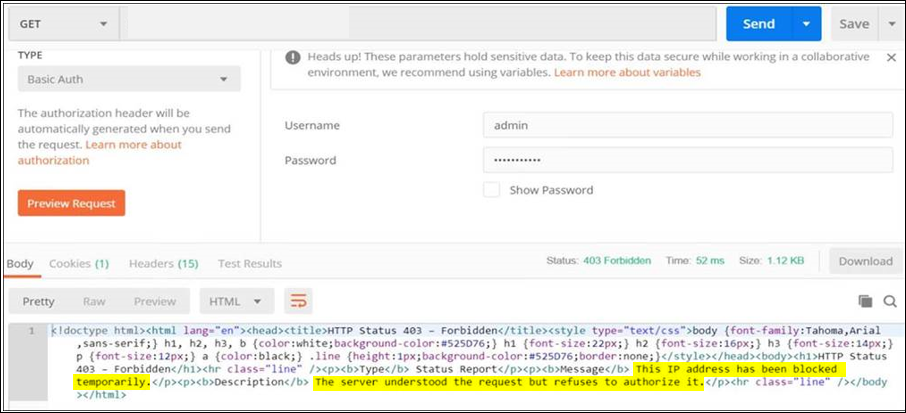
2) You will be able to login NSX portal but will not be able to use APIs. Not even through any other API tool like postman. You might get error like below


3) I uses VMware Cloud Director which uses NSX for networking and security service. On VMware Cloud Director, I could see error like below when you open any Edge Gateway or do any configuration change. Below are the VCD debug logs-

2021-07-12 16:18:52,955 | DEBUG    | task-service-activity-pool-128 | NetworkSecurityErrorHandler    | Response error: <!doctype html><html lang="en"><head><title>HTTP Status 403 – Forbidden</title><style type="text/css">body {font-family:Tahoma,Arial,sans-serif;} h1, h2, h3, b {color:white;background-color:#525D76;} h1 {font-size:22px;} h2 {font-size:16px;} h3 {font-size:14px;} p {font-size:12px;} a {color:black;} .line {height:1px;background-color:#525D76;border:none;}</style></head><body><h1>HTTP Status 403 – Forbidden</h1><hr class="line" /><p><b>Type</b> Status Report</p><p><b>Message</b> This IP address has been blocked temporarily.</p><p><b>Description</b> The server understood the request but refuses to authorize it.</p><hr class="line" /></body></html> | requestId=18cbd3bc-2eaf-42af-b11e-4bce957bff9e,request=POST https://testvcd.com/api/admin/edgeGateway/509ed27c-724d-490b-b0c7-e25d19523017/action/redeploy,requestTime=1626106731682,remoteAddress=172.25.1.21:60592,userAgent=Mozilla/5.0 (Windows NT 6.3; Win64; x64) AppleWebKit/537.36 (...,accept=application/*+json;version 34.0 vcd=632554b9-0779-4ddc-8b62-be08d1c167f6,task=82c8a4fc-35ba-490a-a235-b4a65a25cace activity=(com.vmware.vcloud.backendbase.management.system.TaskActivity,urn:uuid:82c8a4fc-35ba-490a-a235-b4a65a25cace)

4) I checked the NSX Manager logs and could see multiple events like below in /usr/appmgmt-webserver/logs/localhost_access_log.2021-07-13.txt. 

Where localhost_access_log.2021-07-13.txt. This filename will change as per current date in logs.

172.25.1.239 - - [13/Jul/2021:23:21:38 +0200] "GET /api/2.0/services/ipset/ipset-29 HTTP/1.1" "https-jsse-nio-443-exec-2292" 403 649 2234
172.25.1.239 - - [13/Jul/2021:23:21:38 +0200] "GET /api/2.0/services/ipset/ipset-106 HTTP/1.1" "https-jsse-nio-443-exec-2334" 403 649 2241
172.25.1.239 - - [13/Jul/2021:23:21:38 +0200] "GET /api/versions HTTP/1.1" "https-jsse-nio-443-exec-2366" 403 649 2243
172.25.1.239 - - [13/Jul/2021:23:21:38 +0200] "GET /api/versions HTTP/1.1" "https-jsse-nio-443-exec-2325" 403 649 2224

Yellow -  This is IP address which is trying to make a connection with NSX Manager which is failing

Red - This is error code 403 which means access forbidden

Above logs means, IP address (172.25.1.239) is trying connect with NSX Manager but NSX Manager is not allowing access to connect.

Root Cause

When any application (Monitoring or non-monitoring) is configured with incorrect username and password to connect with NSX Manager then as a security feature NSX Manager blacklist that username after certain invalid authentication attempts (by default it is 10 but can be modified). Any user too can do this because someone might be trying to guess the password! be aware of that too ;)

Solution

Before correcting it, you must identify which application or user is doing this. Because if post correction, if still invalid attempts are coming then it will again block the user account. How will you identify that's your headache but you can reach me out :)

Once identified then follow below steps

1. Login NSX Manager CLI with admin

2. enter into enable mode with commad

#enable

3. Enter into engineering mode with command↓

#st en

Press Y when asked and use password :  IAmOnThePhoneWithTechSupport

4. then edit /home/secureall/secureall/sem/WEB-INF/spring/vsmconfig.properties and look for values as below in this file

#Denotes whether blacklisting is enabled
blacklist.enabed=true

You will find it true. 

5. To resolve this issue, first you need to make it false that is from 

blacklist.enabed=true 


blacklist.enabed=false

and then save the file

6. Reboot NSX Manager now with below command

#reboot

7. Once rebooted, you will find that NSX account which you used for integration with other application and which was locked out is now responding over API requests and will give you output as below now.

8. In step 5, you have changed the blacklisting configuration which can be a security vulnerability. As soon as this issue fix, then you need to revert it back to true so that future invalid attempts gets blocked.

9. Post making it true, reboot NSX Manager. Please note that everytime you change it, you have to reboot NSX manager to make it effective.

Don't forget to comment if it was useful for you. Cheers!

,

vCD | How to disable auto-discovery for particular OrgvDC

Overview
How to connect
How to check existing setting
How to update existing setting

Overview

I am creating a post on the subject because there is no clear cut article on this on web or might be I couldn't find straightforward process to do this. Basically, in vCD GUI there is option to disable or enable the auto-discovery for entire vCD system. On org level you cannot disable or enable auto-discovery but you can override this setting on OrgvDC level but with the help of Admin APIs. Hope you know about APIs but what is Admin APIs. This will automatically be answered in this post. Read this post carefully and I hope you will understand this. To know more about auto-discovery, you can check out this post by Tom Fojta.

How to connect

You cannot even check the auto-discovery status for OrgvDC from GUI. You need to use the API. I have already covered this in my previous posts to connect vCD in API tool. Have a look here

How to check existing setting

Once you are connected then Use below api query to extract your Org detail

1. GET https://vcloud_ip_or_fqdn/api/org 

Now, copy entire output and paste into notepad++ or any other text editor you want. Search for Org name where your orgvDC was created. Search in the notepad++ file only. You will get href link from there. Copy that link and paste it in API tool and send GET command. Example is shown below

2. GET https://vcloud_ip_or_fqdn/api/org/a038859f-bf22-4d64-b6dc-e1cb8fdf2fbc"

Now, you will get OrgvDCs list in this org. Copy entire output again and paste it into notepad++ again. Search target OrgvDC name and copy the href for that OrgvDC. Below is the example-

https://vcloud_ip_or_fqdn/api/vdc/a038859f-bf22-4d64-b6dc-e1cb8fdf2fbc"

In order to check the value you need to modify the above href value little bit. Check below

https://vcloud_ip_or_fqdn/api/admin/vdc/a038859f-bf22-4d64-b6dc-e1cb8fdf2fbc"

Hope you could notice the difference in above lines. Now create and send GET command as below

3. GET https://vcloud_ip_or_fqdn/api/admin/vdc/a038859f-bf22-4d64-b6dc-e1cb8fdf2fbc"

Note that if you run the GET command with adding "admin" then only you will get the auto-discovery option in output. Below is the example command and output with "admin" keyword-


Note that, if any OrgvDC output is not having this line that's mean it is following the vDC global level setting and to override this value by adding this line here. I will explain how.

Flase means VM auto-discovery is disabled and true means it is enabled. I explained you the process to get the value to Vm Auto Discovery status for OrgvDC. Now let's how to change this value.


How to update existing setting

To update this value from false to true or true to false or even enter the whole line here, you need to follow below steps

1. From above steps 3, you got orgvDC href value where you send GET query to get the auto vm discovery states, now you replace GET command with PUT command


2. Now, in the output for OrgvDC which you copied into notepad++,  If vmDiscoveryEnabled is false and you want to make it true then change the keyword from false to true and vice-versa. 

3. Copy entire output again after changing the value and paste it in the BODY, select RAW and select xml as shown in my previous post.

4. You will not click on send button now, you need to add one more header here along with other placed headers. Header info is given here and practical use below. For this reason only, I had to create an entire post. This is not clearly mentioned on any article on web so now you have one.


In case, you want to use JSON then you can use that too but make sure then JSON must be selected in body where you pasted the data from notepad++.

Once you put the content-type then make sure you have entered the right vDC href and selected operations in PUT and not GET. 

Now hit the send button.

You will get message "202 Accepted" if all went good.


,

vCD | How to select ESP as Protocol in firewall rule of ESG

Overview
How to connect
How to extract edge firewall rules config
How to update edge firewall rules config

Overview

This post is to share the process to change the existing available protocols in NSX-v Edge firewall rule (Not DFW). Available protocols are TCP, UDP, ICMP and Any on vCD's Edge Service Gateway page. See below image.
My customer's demand was to set another protocol here which is ESP. I checked on GUI and it was clear that it is not possible from here so I could change it successfully from API queries.

How to connect

Before updating this firewall rule field, we must know that how to connect vCloud Director in any API tool. You can use Postman, Insomnia, ARC (Advance Rest Client) as a tool to connect vCD. You might need to disable SSL check before executing any api call. Below snippet is from Postman API tool.

Once that SSL check is disabled then
1. Set Authorization as Basic Auth. See below image

2. Set header as mentioned below
Accept application/*;version=32.0

Version can be according to your vCD version. 

3. Now create api query like https://vcloud_ip_or_fqdn/api/sessions and select POST in query type. It will be like
POST https://vcloud_ip_or_fqdn/api/sessions
This query is to get authorization and access token. Once you entered the URL and selected query type as POST then hit "Send" button to run this query.
Post run you will get "200 OK" and authorization and access token headers. See below images


Use above two headers as shown in below images

Now, you are ready to do any operations in vCD using this API tool

How to extract edge firewall rules config


Use below api query to extract your Org detail

1. GET https://vcloud_ip_or_fqdn/api/org

Copy the output and paste in Notepad++. Search for target OrgvDC name where your edge is residing. Then create another query and run it

2. GET https://vcloud_ip_or_fqdn/api/vdc/a038859f-bf22-4d64-b6dc-e1cb8fdf2fbc"

You will see similar output in your Notepad++ data. Just copy vdc href from notepad++ file not from here and paste in Postman and then hit send

Here, you will have another output from OrgvDC. Search here the edge name. You will get line like below. Copy that line similar below and run another query 
https://iaas-sin.aticloud.aero/network/vdc/a038859f-bf22-4d64-b6dc-e1cb8fdf2fbc/edges
Now, create a API call like

3. GET https://vcloud_ip_or_fqdn/network/vdc/a038859f-bf22-4d64-b6dc-e1cb8fdf2fbc/edges

It will give you output like below. Only single line.

https://vcloud_ip_or_fqdn/network/edges/1343b683-bdca-4b80-9e19-8d668f98d8bc

Now, again create a query to fetch edge firewall services. It will be like

4. GET https://vcloud_ip_or_fqdn/network/edges/1343b683-bdca-4b80-9e19-8d668f98d8bc/firewall/config. 

It will give you all configuration of this edge. 

How to update edge firewall rules config

It is a simple process. Copy the output of point 4 in text editor like notepad++ and search for entries like below-
<application>
  <service>
    <protocol>tcp</protocol>
    <port>any</port>
    <sourcePort>any</sourcePort>

Here in protocol we need to replace it from tcp to esp. In notepad++ itself change the field to esp. It will be like below
<application>
  <service>
    <protocol>esp</protocol>
    <port>any</port>
    <sourcePort>any</sourcePort>
Now, copy entire output from notepad++. Full output not these 5 lines. and paste in postman. where? See below-


Once done, create below query

PUT https://vcloud_ip_or_fqdn/network/edges/1343b683-bdca-4b80-9e19-8d668f98d8bc/firewall/config

and hit send button. That's it. To cross check it either you can check in GUI or again follow "How to extract edge firewall rules config"
,

vROPS | how to check manually uploaded PAK file status

 Hello Guys,

VMware has this process mentioned but that is confusing to me and I had to deal it differently to make it happen. So, I thought to write down on my blog. I hope it will help many. Its again amazing that this process is not included in vROPS API guide.

Basically, after manually upload the PAK file or you can say that after pre-staging of PAK file, we need to ensure now that we did it right so we have to use this API way to check that.

Step 1 : Connect vROPS in API as per instructions in vROPS API guide
Step 2 : Again, as per instructions in api guide, use vrops auth token and basic authentication now.
Step 3 : This step, I didn't find anywhere in API guide. You need to modify the command as shown below with GET operation and then hit the search button.
https://myvrops.com:443/casa/upgrade/cluster/pak/vRealizeOperationsManagerEnterprise-81116522883/status

vRealizeOperationsManagerEnterprise-81116522883 > This is the PAK file ID of PAK file which I uploaded manually and want to check if distributed across the cluster or not.
Once I hit the go button, it give me below output.

=======Start here

{

    "cluster_pak_install_status": "CANDIDATE",

   "slices": [

        {

            "slice_address": "172.25.10.11", >>>>>>>>>>>>>>>>>>>>>>>>>>>>>>Node 1

            "http_code": 200,

            "document": {

                "pak_id": "vRealizeOperationsManagerEnterprise-81116522883",

                "pak_state": "DISTRIBUTED">>>>>>>>>>>>>>>>>>>>>>>>>>>>>> It is Okay

                "pak_install_status": "CANDIDATE",

                "pak_distribution_progress": null,

                "current_action": null,

                "node_unchanged": true,

                "failed_details": null,

                "warning_details": "upgrade.pak.warning",

                "orchestrator_action": "UNKNOWN",

                "pre_upgrade_validation_results_available": false,

                "log_links": []

            },

            "content_type": "application/json"

        },

        {

            "slice_address": "172.25.10.12",>>>>>>>>>>>>>>>>>>>>>>>>>>>>>>>>>>>>Node 2

            "http_code": 200,

            "document": {

                "pak_id": "vRealizeOperationsManagerEnterprise-81116522883",

                "pak_state": "DISTRIBUTED",>>>>>>>>>>>>>>>>>>>>>>>>>>>>>> it is again Okay

                "pak_install_status": "CANDIDATE",

                "pak_distribution_progress": null,

                "current_action": null,

                "node_unchanged": true,

                "failed_details": null,

                "warning_details": "upgrade.pak.warning",

                "orchestrator_action": "UNKNOWN",

                "pre_upgrade_validation_results_available": false,

                "log_links": []

           },

            "content_type": "application/json"

        },

        {

            "slice_address": "172.25.2.238",>>>>>>>>>>>>>>>>>>>>>>>>>>>>>>>>>>>Node3

            "http_code": 200,

            "document": {

                "pak_id": "vRealizeOperationsManagerEnterprise-81116522883",

                "pak_state": "DISTRIBUTED",>>>>>>>>>>>>>>>>>>>>>>>>>>>>>>>>>>>>> Okay

                "pak_install_status": "CANDIDATE",

                "pak_distribution_progress": null,

                "current_action": null,

                "node_unchanged": true,

                "failed_details": null,

                "warning_details": null,

                "orchestrator_action": "UNKNOWN",

                "pre_upgrade_validation_results_available": false,

                "log_links": []

            },

            "content_type": "application/json"

        },

        {

            "slice_address": "172.17.1.238",>>>>>>>>>>>>>>>>>>>>>>>>>>>>>>>>>>>>>Node4

            "http_code": 200,

            "document": {

                "pak_id": "vRealizeOperationsManagerEnterprise-81116522883",

                "pak_state": "DISTRIBUTED",>>>>>>>>>>>>>>>>>>>>>>>>>>>>>>>>>>>>> Okay

                "pak_install_status": "CANDIDATE",

                "pak_distribution_progress": null,

                "current_action": null,

                "node_unchanged": true,

                "failed_details": null,

                "warning_details": "upgrade.pak.warning",

                "orchestrator_action": "NO_ACTION",

                "pre_upgrade_validation_results_available": false,

                "log_links": []

            },

            "content_type": "application/json"

        },

        {

            "slice_address": "172.17.1.239",>>>>>>>>>>>>>>>>>>>>>>>>>>>>>>>>>>>>>Node5

            "http_code": 200,

            "document": {

                "pak_id": "vRealizeOperationsManagerEnterprise-81116522883",

                "pak_state": "DISTRIBUTED",>>>>>>>>>>>>>>>>>>>>>>>>>>>>>>>>>>> Okay

                "pak_install_status": "CANDIDATE",

                "pak_distribution_progress": null,

                "current_action": null,

                "node_unchanged": true,

                "failed_details": null,

                "warning_details": "upgrade.pak.warning",

                "orchestrator_action": "NO_ACTION",

                "pre_upgrade_validation_results_available": false,

                "log_links": []

            },

            "content_type": "application/json"

        },

        {

            "slice_address": "172.25.3.238",>>>>>>>>>>>>>>>>>>>>>>>>>>>>>>>>>>>>Node 6

            "http_code": 200,

            "document": {

                "pak_id": "vRealizeOperationsManagerEnterprise-81116522883",

                "pak_state": "DISTRIBUTED",>>>>>>>>>>>>>>>>>>>>>>>>>>>>>>>>>>>>>> Okay

                "pak_install_status": "CANDIDATE",

                "pak_distribution_progress": null,

                "current_action": null,

                "node_unchanged": true,

                "failed_details": null,

                "warning_details": "upgrade.pak.warning",

                "orchestrator_action": "UNKNOWN",

                "pre_upgrade_validation_results_available": false,

                "log_links": []

            },

            "content_type": "application/json"

        },

        {

            "slice_address": "172.17.1.237",>>>>>>>>>>>>>>>>>>>>>>>>>>>>>>>>>>>>>>Node 7

            "http_code": 200,

            "document": {

                "pak_id": "vRealizeOperationsManagerEnterprise-81116522883",

                "pak_state": "NOT_DISTRIBUTED>>>>>>>>>>>>>>>Here is the difference but still OK

                "pak_install_status": "INITIAL",

                "pak_distribution_progress": "6962",

                "current_action": null,

                "node_unchanged": true,

                "failed_details": null,

                "warning_details": "upgrade.pak.warning",

                "orchestrator_action": "NO_ACTION",

                "pre_upgrade_validation_results_available": false,

                "log_links": []

            },

            "content_type": "application/json"

        },

        {

            "slice_address": "172.17.1.248",>>>>>>>>>>>>>>>>>>>>>>>>>>>>>>>>>>>>Host8

            "http_code": 200,

            "document": {

                "pak_id": "vRealizeOperationsManagerEnterprise-81116522883",

                "pak_state": "DISTRIBUTED",>>>>>>>>>>>>>>>>>>>>>>>>>>>>>>>>>>>> Okay

                "pak_install_status": "CANDIDATE",

                "pak_distribution_progress": null,

                "current_action": null,

                "node_unchanged": true,

                "failed_details": null,

                "warning_details": "upgrade.pak.warning",

                "orchestrator_action": "NO_ACTION",

                "pre_upgrade_validation_results_available": false,

                "log_links": []

            },

            "content_type": "application/json"

        },

        {

            "slice_address": "172.25.3.237",>>>>>>>>>>>>>>>>>>>>>>>>>>>>>>>>>Node 9

            "http_code": 200,

            "document": {

                "pak_id": "vRealizeOperationsManagerEnterprise-81116522883",

                "pak_state": "DISTRIBUTED",>>>>>>>>>>>>>>>>>>>>>>>>>>>>>>>>>>> Okay

                "pak_install_status": "CANDIDATE",

                "pak_distribution_progress": null,

                "current_action": null,

                "node_unchanged": true,

                "failed_details": null,

                "warning_details": null,

                "orchestrator_action": "UNKNOWN",

                "pre_upgrade_validation_results_available": false,

                "log_links": []

            },

            "content_type": "application/json"

        },

        {

            "slice_address": "172.25.1.244",>>>>>>>>>>>>>>>>>>>>>>>>>>>>>>>>>>>>Node 10

            "http_code": 200,

            "document": {

                "pak_id": "vRealizeOperationsManagerEnterprise-81116522883",

                "pak_state": "DISTRIBUTED",>>>>>>>>>>>>>>>>>>>>>>>>>>>>>>>>>>>>> Okay

                "pak_install_status": "CANDIDATE",

                "pak_distribution_progress": null,

                "current_action": null,

                "node_unchanged": true,

                "failed_details": null,

                "warning_details": null,

                "orchestrator_action": "UNKNOWN",

                "pre_upgrade_validation_results_available": false,

                "log_links": []

            },

            "content_type": "application/json"

        }

    ],

    "cluster_data": {

        "cluster_action_failed": false,

        "cluster_action_failed_time": null,

        "cluster_action": "NO_ACTION"

    }

}

 =======End here

Please ignore any spelling or formatting slip-up due to lack of time but technical stuff is never compromised. Feel free to write me back in case of any confusion.