Hi Folks,
I found very few article on GRE tunnel creation in NSX so, thought to contribute :) I'll be happy if it is useful for you!
So, first of all GRE creation is not possible in vCenter NSX GUI. It can only be created via API tool,
Starting from version 6.4.
Let's explore how to use NSX API and how to create GRE tunnel.
Step 1 - Download and install any Rest API client. It can be Postman\Insomnia\Advance Rest Api or any other and open it.
Step 2 - Connect NSX Manager in your API client and get edge-id of your target edge (If you don't know already)
- 2.1 Connect NSX Manager by giving header and authentication information
Feed header info as shown below-
And authentication as below-
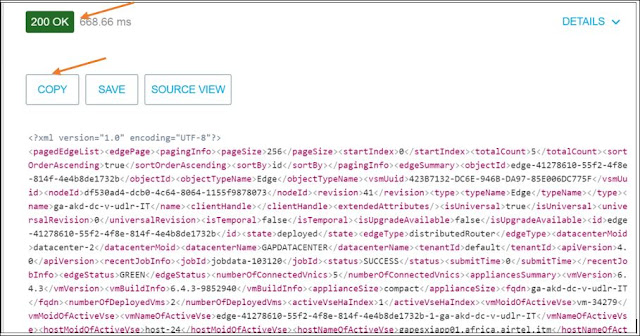
- 2.2 First, Get your edge-id with below api query if you don't know already. Put NSX manager IP address like, https://NSX_MGR_IP/api/4.0/edges (It will populate all edges in your NSX environment)

You should get 200 OK response as shown below. Copy the output and paste into some notepad++ kind of app and search the name of your target edge
Just like below
Now you know the edge id of target edge. If you know how to, then you can also get it on vCenter GUI as well. right?
Now, use below text, copy it and modify as per your configuration and paste it in RestAPI "Body" as shown in below image.
<tunnel>
<sourceAddress>192.168.200.50</sourceAddress>
<destinationAddress>192.168.100.11</destinationAddress>
<name>greTunn</name>
<description>Gre Tunnel</description>
<type>GRE</type>
<enabled>true</enabled>
<tunnelInterface>
<mtu>1476</mtu>
<tunnelAddresses>
<tunnelAddress>172.20.10.2/30</tunnelAddress>
</tunnelAddresses>
</tunnelInterface>
<greConfig>
<enableKeepAliveAck>true</enableKeepAliveAck>
</greConfig>
<tunnelHealthCheck>
<enabled>true</enabled>
<type>PING</type><interval>3</interval>
<deadTimeMultiplier>3</deadTimeMultiplier>
</tunnelHealthCheck>
</tunnel>
As shown below- Please note the differences and references given in below snippet.
Now when you will click on Send, it will create a GRE tunnel.
Note that GRE tunnel doesn't visible in current versions of NSX and might be in future version.
To test if it is created successfully, there are below ways-
1. After clicking on Send button in last step, you should have 200 OK reply
2. Login NSX edge CLI and ping the destination IP address in your tunnel configuration => If pinging then all okay otherwise check the source\destination and tunnel IP address detail.
3. Again send the GET api call to retrieve vpn tunnels and check if it shows the detail of GRE tunnel.
4. You can also run a command in ESG CLI "show configuration GRE"
Now, it was about creation. If you want to delete it then simple, use below api call.
DELETE https://NSX_IP/api/4.0/edges/{edgeId}/tunnels/{tunnelId}
It will delete only that tunnel whose tunnel id is given. In above command edgeid and tunnelid needs to be given. If you don't know what is tunnelid, give your comment. I will help you out.
That's all Guys!!
Any doubt, feel free to write me up.
Thank you,
vCloudNotes
I found very few article on GRE tunnel creation in NSX so, thought to contribute :) I'll be happy if it is useful for you!
So, first of all GRE creation is not possible in vCenter NSX GUI. It can only be created via API tool,
Starting from version 6.4.
Let's explore how to use NSX API and how to create GRE tunnel.
Step 1 - Download and install any Rest API client. It can be Postman\Insomnia\Advance Rest Api or any other and open it.
Step 2 - Connect NSX Manager in your API client and get edge-id of your target edge (If you don't know already)
- 2.1 Connect NSX Manager by giving header and authentication information
Feed header info as shown below-
And authentication as below-
- 2.2 First, Get your edge-id with below api query if you don't know already. Put NSX manager IP address like, https://NSX_MGR_IP/api/4.0/edges (It will populate all edges in your NSX environment)

You should get 200 OK response as shown below. Copy the output and paste into some notepad++ kind of app and search the name of your target edge
Just like below
Now you know the edge id of target edge. If you know how to, then you can also get it on vCenter GUI as well. right?
Now, use below text, copy it and modify as per your configuration and paste it in RestAPI "Body" as shown in below image.
<tunnel>
<sourceAddress>192.168.200.50</sourceAddress>
<destinationAddress>192.168.100.11</destinationAddress>
<name>greTunn</name>
<description>Gre Tunnel</description>
<type>GRE</type>
<enabled>true</enabled>
<tunnelInterface>
<mtu>1476</mtu>
<tunnelAddresses>
<tunnelAddress>172.20.10.2/30</tunnelAddress>
</tunnelAddresses>
</tunnelInterface>
<greConfig>
<enableKeepAliveAck>true</enableKeepAliveAck>
</greConfig>
<tunnelHealthCheck>
<enabled>true</enabled>
<type>PING</type><interval>3</interval>
<deadTimeMultiplier>3</deadTimeMultiplier>
</tunnelHealthCheck>
</tunnel>
As shown below- Please note the differences and references given in below snippet.
Now when you will click on Send, it will create a GRE tunnel.
Note that GRE tunnel doesn't visible in current versions of NSX and might be in future version.
To test if it is created successfully, there are below ways-
1. After clicking on Send button in last step, you should have 200 OK reply
2. Login NSX edge CLI and ping the destination IP address in your tunnel configuration => If pinging then all okay otherwise check the source\destination and tunnel IP address detail.
3. Again send the GET api call to retrieve vpn tunnels and check if it shows the detail of GRE tunnel.
4. You can also run a command in ESG CLI "show configuration GRE"
Now, it was about creation. If you want to delete it then simple, use below api call.
DELETE https://NSX_IP/api/4.0/edges/{edgeId}/tunnels/{tunnelId}
It will delete only that tunnel whose tunnel id is given. In above command edgeid and tunnelid needs to be given. If you don't know what is tunnelid, give your comment. I will help you out.
That's all Guys!!
Any doubt, feel free to write me up.
Thank you,
vCloudNotes


0 Comments:
Post a Comment